I'll have to come back to this video at a later date, but I've been looking for something like this. Revolution Golf instructor Martin Chuck explains how to let your hands control your pivot to create clubhead speed.
Chuck says this will help older golfers, but note also that he references how Bobby Jones used this technique, so it's not just for older folks!
Most modern players are taught to use their pivot to control their hands (because they tend to overuse their hands), but this is the exact opposite of that technique (although most pros do use a combination of both). I've written about using the momentum of your hands and arms to help pull you through to your finish; Chuck uses the word inertia, which is the same thing.
It's basic physics: An object in motion tends to remain in motion. By using your hands to get the club moving, the club can help you keep moving all the way through your swing. You start the motion by bending your trailing elbow on the backswing, then you straighten it on the downswing just after you strike the ball. This straightening is what creates the momentum to pull you through to your finish.
As I said earlier, I'll come back to this video in a few days. But for now, be aware that this is the same sort of thing you learn when you use the L-to-L drill that I mention every so often. (Here's a link to one of the posts that includes video showing how it's done.) Combine the info from Chuck's video with the L-to-L drill, and you should find it pretty easy to make a hand-controlled pivot.
I know I say this a lot, but the golf swing isn't all that hard. It's just that we spend too much time focusing on trying to do things that would happen on their own if we just focused on the important things. This is one of those important things that will help simplify the game for you.

Showing posts with label downswing. Show all posts
Showing posts with label downswing. Show all posts
Saturday, August 4, 2018

Sunday, July 8, 2018
Cindy Miller on a Relaxed Lead Arm (Video)
This older video from LPGA instructor Cindy Miller kind of goes along with yesterday's post about topping... but it approaches the problem of poor ball contact from the "other side" of the swing -- the upper body, rather than the lower body.
Cindy is attacking the myth that you need to keep your lead arm straight during your swing. Now, we're not talking about bending your lead elbow at a 90° angle at the top of your backswing. (Although some players do learn to play well that way. If you do, you know it.) Rather, we're talking about trying to keep your lead arm dead straight throughout your swing.
I've mentioned this "ramrod striaght" myth many times when talking about the one-piece takeaway. You don't want your lead arm stiff -- it should be relaxed and will flex slightly as you swing to the top of your swing, then return to its address position as you make your downswing. This is a natural movement for your arm -- you do it all the time when you make any kind of sweeping motion with your arm. You want to just let it happen when you swing the club as well.
In this video Cindy mentions two problems that keeping your lead arm stiff will cause. First, it can cause you to "stand up" during your backswing, just as Andrew Reynolds mentioned yesterday in that post. Stiff arms cause you to lift up and straighten up -- but this time, you overcorrect on your way down and stick the clubhead in the ground. Can you say fat shot?
The second thing this move does is cause you to open the clubface on the way back, then you leave it open on the way down. That's because a stiff lead arm won't drop back down into your normal address position, which means your arms don't rotate back to their address position where the face was square.
Ironically, you can do this upper body lifting and yesterday's lower body "push up" at the same time. What happens? Depending on which one you exaggerate, you might hit the ball fat or thin, without any apparent logic. And if you do hit the ball, the combination will likely create an over-the-top swing with an open clubface, creating that nasty banana ball we all hate.
So hopefully this week's series of posts will help you understand how excess movement in your swing -- created by trying to reach for a bigger turn than is natural for your flexibility -- can create poor contact and unwanted ball flights. So many of these problems, both with your upper body and your lower body, are caused by unnecessary tension in your arms and legs.
Maybe I'll try to post some relaxation drills next week. Learning to relax isn't hard, but a little encouragement can't hurt!
Cindy is attacking the myth that you need to keep your lead arm straight during your swing. Now, we're not talking about bending your lead elbow at a 90° angle at the top of your backswing. (Although some players do learn to play well that way. If you do, you know it.) Rather, we're talking about trying to keep your lead arm dead straight throughout your swing.
I've mentioned this "ramrod striaght" myth many times when talking about the one-piece takeaway. You don't want your lead arm stiff -- it should be relaxed and will flex slightly as you swing to the top of your swing, then return to its address position as you make your downswing. This is a natural movement for your arm -- you do it all the time when you make any kind of sweeping motion with your arm. You want to just let it happen when you swing the club as well.
In this video Cindy mentions two problems that keeping your lead arm stiff will cause. First, it can cause you to "stand up" during your backswing, just as Andrew Reynolds mentioned yesterday in that post. Stiff arms cause you to lift up and straighten up -- but this time, you overcorrect on your way down and stick the clubhead in the ground. Can you say fat shot?
The second thing this move does is cause you to open the clubface on the way back, then you leave it open on the way down. That's because a stiff lead arm won't drop back down into your normal address position, which means your arms don't rotate back to their address position where the face was square.
Ironically, you can do this upper body lifting and yesterday's lower body "push up" at the same time. What happens? Depending on which one you exaggerate, you might hit the ball fat or thin, without any apparent logic. And if you do hit the ball, the combination will likely create an over-the-top swing with an open clubface, creating that nasty banana ball we all hate.
So hopefully this week's series of posts will help you understand how excess movement in your swing -- created by trying to reach for a bigger turn than is natural for your flexibility -- can create poor contact and unwanted ball flights. So many of these problems, both with your upper body and your lower body, are caused by unnecessary tension in your arms and legs.
Maybe I'll try to post some relaxation drills next week. Learning to relax isn't hard, but a little encouragement can't hurt!
Sunday, June 10, 2018
Harvey Penick's Magic Move (Video)
This is a decidedly mechanical video, which I generally try to avoid. But Harvey Penick was a legendary teacher, and this video from The Art of Simple Golf does a good job of explaining this technique. Done slowly as a drill, a mechanical action like this can teach you a basic swing feel.
Whether you lift your lead heel or not, let me restate the "Magic Move" so you understand what it is:
Here's one more thought that will make this downswing drill translate more easily to your actual swing: Don't try to point the club shaft parallel to your foot line, as it appears in the video. At the "magic" position, although your club shaft will be roughly parallel to the ground, it should actually point outward at a 20° to 30° angle away from you. The reason is because, during an actual swing, your wrists will be starting to uncock at this point, so the club will be starting to move down into impact position. By practicing with this slight angle, it will feel more like an actual swing.
Again, this is a very mechanical drill and, if you use it, make the downswing move very slowly. Some of you won't find much use for it, but it can be very helpful if you're uncocking your wrists too early in your downswing.
Just remember, DO IT VERY SLOWLY. That's how martial artists train to use unfamiliar moves for rapid movement, and you'll learn new moves better that way as well.
Whether you lift your lead heel or not, let me restate the "Magic Move" so you understand what it is:
To start your downswing, let your lead knee move back toward the target so your lower leg -- that is, from knee to ankle -- is vertical. AT THE SAME TIME, swing your trailing arm down so your upper arm -- from shoulder to elbow -- is vertical as well. Your trailing forearm will point straight "toward the camera" from this position.That is a very technical description, and I don't expect you to swing with any kind of speed while thinking about this complex motion. Rather, the way to use this is as a slow-motion drill. Swing to the top of your backswing, then swing down to the "magic" position very slowly. And I do mean SLOWLY -- take a four-count to do it. This way, you will get used to how your muscles move and your weight shifts without developing a lot of bad habits.
Here's one more thought that will make this downswing drill translate more easily to your actual swing: Don't try to point the club shaft parallel to your foot line, as it appears in the video. At the "magic" position, although your club shaft will be roughly parallel to the ground, it should actually point outward at a 20° to 30° angle away from you. The reason is because, during an actual swing, your wrists will be starting to uncock at this point, so the club will be starting to move down into impact position. By practicing with this slight angle, it will feel more like an actual swing.
Again, this is a very mechanical drill and, if you use it, make the downswing move very slowly. Some of you won't find much use for it, but it can be very helpful if you're uncocking your wrists too early in your downswing.
Just remember, DO IT VERY SLOWLY. That's how martial artists train to use unfamiliar moves for rapid movement, and you'll learn new moves better that way as well.
Friday, May 4, 2018
Martin Hall's Downswing Drill (Video)
This short Home School video is actually pretty sweet. It's an equipment-free, do-it-in-your-living-room drill to help you learn an in-to-out swing path. And all you need is a magazine and a convenient wall.
Just a few simple steps.
Still, you might want to try it a time or two, just to get a feel for starting your downswing in a more downward manner. After all, if you don't 'drop the club' a bit as you start down, you'll really have trouble learning to draw the ball. But in that case, I would only try to keep the magazine tip against the wall for perhaps half as long as Martin shows in the video -- that is, halfway between your shoulders and waist. That way, it will help improve your footwork if you tend to drive your legs too hard to start your downswing.
Just a few simple steps.
- Roll up the magazine and hold it like a club. Martin says a golf magazine; that's because it will give you a 'club' that's roughly a foot long.
- Stand with your back to the wall and make a 3/4 backswing. That's means your hands are shoulder high.
- At the top of your 3/4 backswing, the tip of the magazine should touch the wall. And it should stay in touch with the wall during your downswing until your hands are waist high.
- Then return your hands to their impact position.
Still, you might want to try it a time or two, just to get a feel for starting your downswing in a more downward manner. After all, if you don't 'drop the club' a bit as you start down, you'll really have trouble learning to draw the ball. But in that case, I would only try to keep the magazine tip against the wall for perhaps half as long as Martin shows in the video -- that is, halfway between your shoulders and waist. That way, it will help improve your footwork if you tend to drive your legs too hard to start your downswing.
Friday, April 20, 2018
David Ogrin's "Chain Club" Drill (Video)
GCA coach David Ogrin gave a tip on Morning Drive Thursday that used an interesting piece of equipment made from a shaft, a golf ball and a length of chain. Here, take a look:
It's an interesting way to teach clubhead speed -- specifically, how to use your hands and arms to create it. It's yet another approach that uses clubs in different ways to teach you when to uncock your wrists. Hear that swish at the end of Ogrin's swing?
Yeah, you've heard that before. You understand how this drill works now, don't you?
Of course you do.
The problem comes when you try to get hold of a club shaft with a golf ball and a chain instead of a club head. Fret not, my friends. There are other ways to get the same benefits.
Let me refer you to two of my past posts with no less than three -- yes, THREE! -- videos featuring Mike Malaska. Ironically, I posted them within a week of each other.
It's an interesting way to teach clubhead speed -- specifically, how to use your hands and arms to create it. It's yet another approach that uses clubs in different ways to teach you when to uncock your wrists. Hear that swish at the end of Ogrin's swing?
Yeah, you've heard that before. You understand how this drill works now, don't you?
Of course you do.
The problem comes when you try to get hold of a club shaft with a golf ball and a chain instead of a club head. Fret not, my friends. There are other ways to get the same benefits.
Let me refer you to two of my past posts with no less than three -- yes, THREE! -- videos featuring Mike Malaska. Ironically, I posted them within a week of each other.
- The first is called Jim Flick on the TWO Pendulums in Your Swing and it has two videos with different versions of the L-to-L drill, which I think is one of the greatest drills for creating swing speed ever created. There's a "standard" version to teach how your hands create clubhead speed, and an "advanced" version that uses the drill to teach shot shaping.
- The other post is Mike Malaska on Controlling the Clubface, and it works well with the L-to-L drill. It teaches you how to use your hands to control the clubface, which is part of what that "advanced" L-to-L drill from the other post teaches you.
Sunday, April 15, 2018
Martin Hall on Getting More Distance (Video)
Hall did this video last week to help older players get more distance, but not understanding how to use your hands and arms keeps a lot of players from hitting it out there. This video is a very simple explanation of how it works.
Okay, there are two parts to this, and if you're too fixated on swinging around your body you'll never get the hang of it.
And yes, I have more videos to help you. I've posted them in past posts, so here are the links.
The first post teaches you how that upward cocking motion creates your "top of backswing" position. It's called Using Your Hands in the Takeaway and it features K.J. Choi's instructor Steven Bann. As I said, it will help you understand how that upward cocking action creates the so-called "textbook" position at the top.
And the other post is called Jim Flick on the TWO Pendulums in Your Swing, which I also referenced in the Nick Faldo post from yesterday. That "L-to-L" drill is a great way to learn that lead wrist upcock motion that Martin Hall is talking about.
Yes, I know I recommend a lot of drills over and over, but that's because they are proven drills that teach a number of skills and they work for almost everybody. Work with them and you'll find out for yourself.
And in this case, you'll pick up some extra distance, even if you aren't particularly old. Yet.
Okay, there are two parts to this, and if you're too fixated on swinging around your body you'll never get the hang of it.
- First, you cock your trailing elbow up and down.
- Second, you cock your lead wrist up and down.
And yes, I have more videos to help you. I've posted them in past posts, so here are the links.
The first post teaches you how that upward cocking motion creates your "top of backswing" position. It's called Using Your Hands in the Takeaway and it features K.J. Choi's instructor Steven Bann. As I said, it will help you understand how that upward cocking action creates the so-called "textbook" position at the top.
And the other post is called Jim Flick on the TWO Pendulums in Your Swing, which I also referenced in the Nick Faldo post from yesterday. That "L-to-L" drill is a great way to learn that lead wrist upcock motion that Martin Hall is talking about.
Yes, I know I recommend a lot of drills over and over, but that's because they are proven drills that teach a number of skills and they work for almost everybody. Work with them and you'll find out for yourself.
And in this case, you'll pick up some extra distance, even if you aren't particularly old. Yet.
Thursday, March 22, 2018
Martin Hall's Sponge Drill (Video)
This is a super-short Home School video from Martin on how to use a sponge -- no club -- to keep your hands, arms and shoulders in sync during your swing.
The drill is self-explanatory, but here's why it works: The flat side of the sponge should stay parallel to your chest throughout the drill. You're using a half-swing, about shoulder height. If the sponge starts to tilt so one edge or the other is angled, then your arms and chest aren't swinging together.
This drill will show you whether you're "getting stuck" (your trailing elbow collapses before you hit the ball) or "scooping" (your lead elbow collapses as you hit the ball). It's a nice visual way to get feedback, even without a club.
The drill is self-explanatory, but here's why it works: The flat side of the sponge should stay parallel to your chest throughout the drill. You're using a half-swing, about shoulder height. If the sponge starts to tilt so one edge or the other is angled, then your arms and chest aren't swinging together.
This drill will show you whether you're "getting stuck" (your trailing elbow collapses before you hit the ball) or "scooping" (your lead elbow collapses as you hit the ball). It's a nice visual way to get feedback, even without a club.
Wednesday, March 7, 2018
Martin Hall's Wrist Cock Drill (Video)
Here's another of Hall's Home School videos that I think is just cool. This short video teaches you how to use a nearly empty soda bottle to improve your release at impact.
Simple enough, right? Just leave a little soda in the bottle, hold it upside down in your golf grip, then make your downswing move and try to keep the soda in the neck of the bottle until you get down near impact. It will help you develop a feel for what a "late release" feels like.
And when you're done, you can reward yourself with a handy drink! How much better does a drill get?
Simple enough, right? Just leave a little soda in the bottle, hold it upside down in your golf grip, then make your downswing move and try to keep the soda in the neck of the bottle until you get down near impact. It will help you develop a feel for what a "late release" feels like.
And when you're done, you can reward yourself with a handy drink! How much better does a drill get?
Thursday, March 1, 2018
Martin Hall on Mickey Wright (Video)
This was Martin Hall's Night School video from last Friday. It's hard to go wrong with anything that copies the legendary Mickey Wright -- even Hogan said she had the best swing he'd ever seen. This video has a Wright tip that Martin found.
I like this tip because it's deceptively simple -- just curl your lead fingers around the club handle as you start your downswing. Essentially all you're doing is tightening your grip a little. Mickey said this would help prevent a slice.
PLEASE NOTE: This isn't the same thing as Dustin Johnson bowing his wrist! You aren't manipulating the clubface in any way. You're just firming up your grip so you don't (a) let the club twist in your hand or (b) get sloppy with your wrists and rotate the clubface open. This is just a way to make sure that you start down in the same position that you went up!
I like simple tips like this. It's pretty easy to make them a regular part of your swing without an excessive amount of practice.
I like this tip because it's deceptively simple -- just curl your lead fingers around the club handle as you start your downswing. Essentially all you're doing is tightening your grip a little. Mickey said this would help prevent a slice.
PLEASE NOTE: This isn't the same thing as Dustin Johnson bowing his wrist! You aren't manipulating the clubface in any way. You're just firming up your grip so you don't (a) let the club twist in your hand or (b) get sloppy with your wrists and rotate the clubface open. This is just a way to make sure that you start down in the same position that you went up!
I like simple tips like this. It's pretty easy to make them a regular part of your swing without an excessive amount of practice.
Sunday, October 22, 2017
Kevin Weeks on Body Rotation (Video)
I bet you'll look at this video and say, "Oh, I know that drill." No, you don't -- at least, you don't understand it. Instructor Kevin Weeks has given this drill a twist (pun intended) that you won't believe until you do it.
The standard version of the drill goes something like this: Place a glove or something under your lead arm, in your armpit, and hit balls. It's okay for the glove to drop to the ground when you reach the top of your finish. This teaches you connection.
THAT IS NOT THIS DRILL. Let me explain the Weeks version to you.
You use a towel and fold it up. You want it so that if your arm separates from your chest too much, that baby is going to open up even if it doesn't drop. Then you hold your club in your lead hand ONLY and make swings without dropping the towel at any point in your swing. Why?
Because this drill isn't about connection. It's about body rotation.
You have trouble with slices because you don't finish your rotation during your downswing. You have trouble with chicken wings because you don't finish your rotation during your downswing. You have trouble with weight shift because you don't finish your rotation during your downswing.
Do you understand? Many of your swing problems happen because you don't finish your rotation during your downswing. This drill teaches you what complete rotation feels like.
Weeks says you should only hit the ball around 25 yards or so. That creates enough speed to pull your arm away from your body if you don't rotate completely to your finish, but not so much that your arm goes high and you drop the towel. Your elbow will have to fold and your body will have to turn in order to keep that towel in place.
Learning what rotation to a complete finish feels like is vital if you're going to develop consistency in your shotmaking. This is a great drill that will help you. Give it a try!
The standard version of the drill goes something like this: Place a glove or something under your lead arm, in your armpit, and hit balls. It's okay for the glove to drop to the ground when you reach the top of your finish. This teaches you connection.
THAT IS NOT THIS DRILL. Let me explain the Weeks version to you.
You use a towel and fold it up. You want it so that if your arm separates from your chest too much, that baby is going to open up even if it doesn't drop. Then you hold your club in your lead hand ONLY and make swings without dropping the towel at any point in your swing. Why?
Because this drill isn't about connection. It's about body rotation.
You have trouble with slices because you don't finish your rotation during your downswing. You have trouble with chicken wings because you don't finish your rotation during your downswing. You have trouble with weight shift because you don't finish your rotation during your downswing.
Do you understand? Many of your swing problems happen because you don't finish your rotation during your downswing. This drill teaches you what complete rotation feels like.
Weeks says you should only hit the ball around 25 yards or so. That creates enough speed to pull your arm away from your body if you don't rotate completely to your finish, but not so much that your arm goes high and you drop the towel. Your elbow will have to fold and your body will have to turn in order to keep that towel in place.
Learning what rotation to a complete finish feels like is vital if you're going to develop consistency in your shotmaking. This is a great drill that will help you. Give it a try!
Friday, August 25, 2017
A Thought on Starting Down from the Top
Today I have a simple quote from an old book called Such a Little Secret by John W. Barrett. It concerns the change of direction and the start of the downswing. I'm passing this on because it seems to be a good description of what happens, one that is helpful no matter what swing method you use.
Barrett likes to give movements numbers, so when you see Element Number Three in the text, that's just how he refers to the order of the change of direction in the swing sequence. Also, note that he assumes you're righthanded, so you lefties out there should substitute "right" for "left."
First, Barrett says "only some of the weight" is transferred, and that little bit is below the waist. He says at a later point that a "massive hip and knees slide" causes the upper body to move far too much, but that such a move is unfortunately taught all too often. If you keep those exaggerations out of the lateral move, you'll find that your upper body doesn't lurch forward when you swing. That problem is the result of using your legs incorrectly.
Second -- and this is the part that really caught my attention, because he stated it so well in that final paragraph -- is that the hips move toward the target just enough to replant the lead heel and lift the trailing heel. He also says that the hips rotate simultaneously with that small lateral move.
You got that? None of that "slide and turn" stuff. That is an exaggeration that changes all the correct posture you tried so hard to create at address! In past posts I've explained it as "almost falling" from the top of the backswing, because that lets gravity help create the small weight shift you need to get everything moving toward the target without overdoing it. But it doesn't matter how you feel it, so long as you don't overdo it!
This is a very simple tip, but it will do wonders to help improve both your accuracy and your distance, simply because it will help you deliver the clubhead to the ball with more consistency. And if there's a Holy Grail in this game, it's consistency.
Barrett likes to give movements numbers, so when you see Element Number Three in the text, that's just how he refers to the order of the change of direction in the swing sequence. Also, note that he assumes you're righthanded, so you lefties out there should substitute "right" for "left."
The correct hitting stroke should definitely commence with a transferring of the weight below the waist to the left foot and leg (Element Number Three). In many instructional articles this movement is invariably described as "shifting the weight" -- a misnomer that has bred more misunderstanding and early disenchantment with the game than anything else. If "shifting the weight" is ambiguous, then "Let the weight all flow to the left" or "Everything must move to the left with the shot" can be downright damaging. In fact it is only some of the weight which is transferred, that below the waist.Let me point out a couple of things here.
As the transfer is made, the upper body and head must retain their position in a vertical plane, remaining well behind the object to be hit.
The movement of the hips to the left should be just enough to plant the left heel firmly to the ground and lift the right heel from it as the weight transfers. Rotation of the hips occurs simultaneously with their small lateral move to the left. [p132-133]
First, Barrett says "only some of the weight" is transferred, and that little bit is below the waist. He says at a later point that a "massive hip and knees slide" causes the upper body to move far too much, but that such a move is unfortunately taught all too often. If you keep those exaggerations out of the lateral move, you'll find that your upper body doesn't lurch forward when you swing. That problem is the result of using your legs incorrectly.
Second -- and this is the part that really caught my attention, because he stated it so well in that final paragraph -- is that the hips move toward the target just enough to replant the lead heel and lift the trailing heel. He also says that the hips rotate simultaneously with that small lateral move.
You got that? None of that "slide and turn" stuff. That is an exaggeration that changes all the correct posture you tried so hard to create at address! In past posts I've explained it as "almost falling" from the top of the backswing, because that lets gravity help create the small weight shift you need to get everything moving toward the target without overdoing it. But it doesn't matter how you feel it, so long as you don't overdo it!
This is a very simple tip, but it will do wonders to help improve both your accuracy and your distance, simply because it will help you deliver the clubhead to the ball with more consistency. And if there's a Holy Grail in this game, it's consistency.
Tuesday, August 22, 2017
Scott McCarron's Driver Swing (Video)
With his third win of the season at the DICK'S Sporting Goods Open Sunday, Scott McCarron pulled to roughly $800k behind Schwab Cup leader Bernhard Langer. I thought it might be interesting to look at Scott's driver swing and see what we can learn from it.
Let me start by saying that you don't have to swing like Scott does. That's not my point here. What I want you to see is how his swing works. There are many ways to drive a golf ball, and the best players have figured out how to make the different parts of their swings work together. We want to understand how those basics work in Scott's swing.
And the first thing you'll notice is how far back in his stance Scott positions his ball for a driver. The "scientists" among us say we need a launch angle of about 12°, which means we need to be swinging upward when hitting the ball off the tee. That means we need to have our swing center -- which I would place at the point where your spine meets your shoulder girdle -- that needs to be behind the ball at impact.
Because Scott places the ball so far back in his stance -- just ahead of center -- his address position has to take this into account. Therefore he sets up with his spine tilted noticeably backward, and when he swings it appears as if he moves even farther behind the ball. That's not actually true, though -- although his lead shoulder moves farther behind the ball, you can see that his trailing knee DOESN'T MOVE during his backswing. He's holding himself steady, but his shoulder turn (around his reasonably stationary spine position) makes it look like he's moving away. This is something you might notice on many players with a similar setup if you just look for it.
On the downswing Scott's lower body moves forward a bit more dramatically than I would like to see, but this is also a side effect of his ball position. He needs to shift his weight forward but he also has to keep his swing center behind the ball if he hopes to hit upward on the ball. That creates the dramatic hip shift as he starts down. HOWEVER, note that his lead leg and hip are pretty much vertical at impact, preventing him from ending up in a painful reverse-C position at impact.
So despite the body angles created by his nearly centered ball position, Scott manages to avoid bad extremes that could hurt his back. I still find it hard to believe he can hit up on the ball from that position, but he's averaging 292 yards off the tee this season, so it seems to be working for him.
The lesson here is that your ball position places its own demands on your swing. If you're having trouble with your accuracy, the first thing you should check is your ball position. No matter what changes you make to your swing, you won't get the results you want if you position the ball incorrectly for your swing's mechanics.
Let me start by saying that you don't have to swing like Scott does. That's not my point here. What I want you to see is how his swing works. There are many ways to drive a golf ball, and the best players have figured out how to make the different parts of their swings work together. We want to understand how those basics work in Scott's swing.
And the first thing you'll notice is how far back in his stance Scott positions his ball for a driver. The "scientists" among us say we need a launch angle of about 12°, which means we need to be swinging upward when hitting the ball off the tee. That means we need to have our swing center -- which I would place at the point where your spine meets your shoulder girdle -- that needs to be behind the ball at impact.
Because Scott places the ball so far back in his stance -- just ahead of center -- his address position has to take this into account. Therefore he sets up with his spine tilted noticeably backward, and when he swings it appears as if he moves even farther behind the ball. That's not actually true, though -- although his lead shoulder moves farther behind the ball, you can see that his trailing knee DOESN'T MOVE during his backswing. He's holding himself steady, but his shoulder turn (around his reasonably stationary spine position) makes it look like he's moving away. This is something you might notice on many players with a similar setup if you just look for it.
On the downswing Scott's lower body moves forward a bit more dramatically than I would like to see, but this is also a side effect of his ball position. He needs to shift his weight forward but he also has to keep his swing center behind the ball if he hopes to hit upward on the ball. That creates the dramatic hip shift as he starts down. HOWEVER, note that his lead leg and hip are pretty much vertical at impact, preventing him from ending up in a painful reverse-C position at impact.
So despite the body angles created by his nearly centered ball position, Scott manages to avoid bad extremes that could hurt his back. I still find it hard to believe he can hit up on the ball from that position, but he's averaging 292 yards off the tee this season, so it seems to be working for him.
The lesson here is that your ball position places its own demands on your swing. If you're having trouble with your accuracy, the first thing you should check is your ball position. No matter what changes you make to your swing, you won't get the results you want if you position the ball incorrectly for your swing's mechanics.
Saturday, July 22, 2017
Travis Fulton on Inbee Park's Driver Swing (Video)
Here's a quick video from GC's Travis Fulton, focusing on the things he likes best about Inbee Park's driver swing. I want you to notice one thing in particular, something that I often mention on this blog because I think it helps both your accuracy and your back.
Travis particularly likes the fact that Inbee starts her downswing by moving down rather than laterally toward the target. Travis has his reasons for liking this move, but here's my take on it.
And it's definitely something you should consider trying, especially if you have trouble hitting the ball consistently and/or have the occasional sore back after you play.
Travis particularly likes the fact that Inbee starts her downswing by moving down rather than laterally toward the target. Travis has his reasons for liking this move, but here's my take on it.
This move keeps you from "getting stuck" and pushing the shot, helps you make more consistent contact with the ball, puts you in a position to "use the ground" to create clubhead speed, and also takes some of the stress off your back.That's a whole lot of benefits from one simple move, a move that players have used at least since the days of Sam Snead. It's almost like falling from the top of your backswing and landing on both feet -- yes, it's that simple.
And it's definitely something you should consider trying, especially if you have trouble hitting the ball consistently and/or have the occasional sore back after you play.
Wednesday, April 19, 2017
Cristie Kerr's Downswing Move #2 (Video)
Yesterday I posted a face-on video of Cristie Kerr smacking a driver, to help you learn a better move down to the ball. Today I want to add a bit to that instruction, and I'm using a down-the-line video of Cristie's drive to help you see this part better.
I quoted this from the Golf Digest article I referred to in yesterday's post:
In fact, this tip will make the arm motion much easier to learn.
I have often written that I would rather see you move DOWN to start your downswing, not forward toward the target the way many teachers suggest. That's how Sam Snead used to do it, and they didn't call him "Slammin' Sam" for nothing! Cristie does this as well, and the above video will not only help you understand why I recommend this move, but it will help you start your downswing smoothly.
The second and third swings on the above video are slow -- and the third one is REALLY slow, just like yesterday's video, so it's the easiest one to see the move in. When Cristie gets to the top of her backswing, her trailing knee (her right one) is almost straight. But to start her downswing, she bends that knee. That starts her weight moving downward, and that in turn helps pull the club down without changing the amount of bend in her trailing elbow.
But it does more. Bending her trailing knee -- a mini-squat, if you like -- pulls her trailing hip forward, toward the ball, and shifts her weight onto her lead leg. (It has to. If it didn't, she'd lose her balance and fall down!) It's almost as if she fell onto her lead leg and braced herself with it... and since her lead knee is already bent, it automatically "loads up" to push her upward at impact, effectively "using the ground."
That one downward move -- bending her trailing knee to start her downswing and pull her arms downward without changing the angles created at the top by her trailing elbow -- creates both hip rotation AND weight shift without any kind of dramatic hip or leg action... and that means you stay stable over the ball, creating better contact. It also stops you from uncocking your wrists too early in your downswing, so you create more clubhead speed as well.
If you watch both videos and try to feel the rhythm of her backswing-to-downswing move, and then try it out on your own, I think you'll be pleased with the results you get after just a little practice. It's a simple, natural way to use the physics of your swing to create more clubhead speed with less effort.
I quoted this from the Golf Digest article I referred to in yesterday's post:
"Most amateurs are moving their hands hard down toward the ball and moving their bodies toward the target. The key move is to avoid letting your right hip rotate toward the target too early as you move your hands and the club away."And I said that it's easier to get that result if you focus on your arm and shoulder motion by keeping your trailing elbow straighter, rather than focusing on lower body action. I'm not changing that at all. However, I'm going to tie that advice to another tip I've mentioned many times, a tip that works very well with the arm motion I recommended.
In fact, this tip will make the arm motion much easier to learn.
I have often written that I would rather see you move DOWN to start your downswing, not forward toward the target the way many teachers suggest. That's how Sam Snead used to do it, and they didn't call him "Slammin' Sam" for nothing! Cristie does this as well, and the above video will not only help you understand why I recommend this move, but it will help you start your downswing smoothly.
The second and third swings on the above video are slow -- and the third one is REALLY slow, just like yesterday's video, so it's the easiest one to see the move in. When Cristie gets to the top of her backswing, her trailing knee (her right one) is almost straight. But to start her downswing, she bends that knee. That starts her weight moving downward, and that in turn helps pull the club down without changing the amount of bend in her trailing elbow.
But it does more. Bending her trailing knee -- a mini-squat, if you like -- pulls her trailing hip forward, toward the ball, and shifts her weight onto her lead leg. (It has to. If it didn't, she'd lose her balance and fall down!) It's almost as if she fell onto her lead leg and braced herself with it... and since her lead knee is already bent, it automatically "loads up" to push her upward at impact, effectively "using the ground."
That one downward move -- bending her trailing knee to start her downswing and pull her arms downward without changing the angles created at the top by her trailing elbow -- creates both hip rotation AND weight shift without any kind of dramatic hip or leg action... and that means you stay stable over the ball, creating better contact. It also stops you from uncocking your wrists too early in your downswing, so you create more clubhead speed as well.
If you watch both videos and try to feel the rhythm of her backswing-to-downswing move, and then try it out on your own, I think you'll be pleased with the results you get after just a little practice. It's a simple, natural way to use the physics of your swing to create more clubhead speed with less effort.
Tuesday, April 18, 2017
Cristie Kerr's Downswing Move (Video)
Golf Digest did a short post called Change Directions Like Cristie Kerr to Fix Your Driver. (Pretty self-explanatory, to be honest.) Here's the video they included, which I may have used several months back; I don't remember. It's a good video.
The article says, "Most amateurs are moving their hands hard down toward the ball and moving their bodies toward the target. The key move is to avoid letting your right hip rotate toward the target too early as you move your hands and the club away."
That's good advice, but I think it could be simpler. We're just too hung up on driving our lower body -- we think everything has to be described in terms of leg drive. Let me give you a drill that will teach you the move a bit more simply.
What you want to focus on is keeping your trailing elbow straighter. Don't fold your trailing elbow so much as you swing to the top of your backswing. I know, I know -- it feels as if it stops you from turning your shoulders fully, it feels as if it shortens your backswing. it feels too upright. Ignore these feelings! Here's the drill, which will translate very easily to your swing:
An added benefit of this move: You'll get more consistent contact because this motion makes it easier to tell where the bottom of the club is. That means fewer fat and thin shots.
UPDATE: I've added a second post at this link, with an extra tip that may make this move easier to learn.
The article says, "Most amateurs are moving their hands hard down toward the ball and moving their bodies toward the target. The key move is to avoid letting your right hip rotate toward the target too early as you move your hands and the club away."
That's good advice, but I think it could be simpler. We're just too hung up on driving our lower body -- we think everything has to be described in terms of leg drive. Let me give you a drill that will teach you the move a bit more simply.
What you want to focus on is keeping your trailing elbow straighter. Don't fold your trailing elbow so much as you swing to the top of your backswing. I know, I know -- it feels as if it stops you from turning your shoulders fully, it feels as if it shortens your backswing. it feels too upright. Ignore these feelings! Here's the drill, which will translate very easily to your swing:
As you take the club away from the ball, keep your trailing elbow fairly straight for as long as possible. I say "fairly straight" because your elbow HAS to bend some. You can keep it straight longer if you let your lead knee bend toward the center of your stance and your lead heel come off the ground. Stop swinging before you get near a 90° bend in your trailing elbow.
Now, to start your downswing, try to plant your lead heel back on the ground AND swing your arms down without bending your trailing elbow AT THE SAME TIME. Basically, it feels as if you're just holding your arms in the same position while you pivot them down from your shoulder joints. It's like a karate chop with both hands. IF YOU BEND YOUR TRAILING ELBOW EVEN MORE AS YOU START DOWN, YOU'RE DOING IT WRONG!
You may not be able to do this very fast at first, but you'll get used to it. It won't take long. Try it in your backyard until it feels a bit more natural, then try hitting some balls at the range.It won't take long to catch onto the rhythm of this move. It feels a bit awkward because it keeps your trailing hip from moving forward too quickly. After you get used to the move, your swing speed will pick up and you'll start to naturally bend your elbow a bit more... but you'll also start to create more wrist cock on your downswing. If you watch the third swing in the video, which is in much slower motion, you'll see that Cristie's trailing elbow is bent around 100° and her wrist cock increases before her hands reach waist high on her downswing. That will start to happen naturally.
An added benefit of this move: You'll get more consistent contact because this motion makes it easier to tell where the bottom of the club is. That means fewer fat and thin shots.
UPDATE: I've added a second post at this link, with an extra tip that may make this move easier to learn.
Thursday, March 16, 2017
Bobby Jones on Proper Weight Shift
I was rereading some of Sidney Matthew's collection of Bobby Jones's newspaper columns called Bobby Jones Golf Tips: Secrets of the Master and found this interesting tidbit about weight shift during the downswing. It's such a simple image that I thought I'd pass it on.
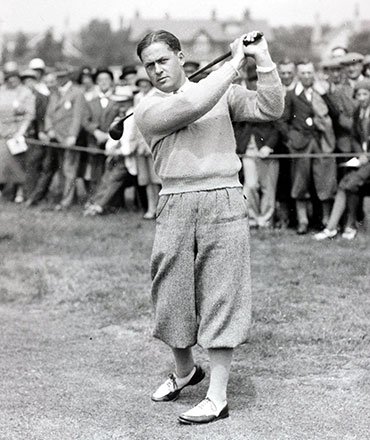 The photo at right comes from the Royal Liverpool at Hoylake's history page. It shows Bobby Jones during his Open win there in 1930, and it shows exactly what Jones said in the article I read called On the Proper Method of Shifting Weight. Note that when Jones talks about the left leg, he means your lead leg. (So you lefties can mentally insert 'right leg.')
To drive upward on the downswing -- that is, straighten your lead knee --it follows that your lead knee has to bend on the backswing. What these two moves do is allow your hips and lower body to move freely during your swing without your upper body lurching around.
Now, how do you make sure you drive upward and don't lean forward? Jones says you "hold the shoulder back while the left hip goes forward." He means that your lead shoulder turns toward your lead heel, and that makes your weight shift properly. You aren't leaning backwards, folks -- you're just turning your upper body so your chest faces the target. (Take a good look at that photo!) This is a strong balanced move into the ball.
If you can't make this move without lurching forward, then you're trying to drive your legs too hard during your downswing. But once you get the hang of this balanced swing, you'll make better contact more often. Good swing mechanics never change...
We just forget how to keep our balance when we try too hard. ;-)
The photo at right comes from the Royal Liverpool at Hoylake's history page. It shows Bobby Jones during his Open win there in 1930, and it shows exactly what Jones said in the article I read called On the Proper Method of Shifting Weight. Note that when Jones talks about the left leg, he means your lead leg. (So you lefties can mentally insert 'right leg.')If we but examine the styles of different golfers, even with the naked eye, it is easy enough to tell whether the weight transference has been a sway or a shift. One characteristic of the proper body action, that is to say, the shift, is that the left leg is straight at and after impact. If you want to know why this is, you have only to look at the time, which marks the left side of the body. It has been lengthened, without lifting the head, by holding the shoulder back while the left hip goes forward. The characteristic of the sway, located again in the left leg, is a decided bend of the left knee in this same area. The entire weight of the body has been thrown forward. The shoulders coming forward also prevent the straightening of the left leg, and either the knee bends more or the player fall flat upon his face. [p94]I find this very interesting simply because Jones is writing around 1930 or so, yet he is saying the most obvious way to get a proper weight shift is to drive upward with your lead leg at impact so your lead hip and upper body don't move too far forward. Push up to move forward in your downswing properly. Sounds rather modern, doesn't it?
To drive upward on the downswing -- that is, straighten your lead knee --it follows that your lead knee has to bend on the backswing. What these two moves do is allow your hips and lower body to move freely during your swing without your upper body lurching around.
Now, how do you make sure you drive upward and don't lean forward? Jones says you "hold the shoulder back while the left hip goes forward." He means that your lead shoulder turns toward your lead heel, and that makes your weight shift properly. You aren't leaning backwards, folks -- you're just turning your upper body so your chest faces the target. (Take a good look at that photo!) This is a strong balanced move into the ball.
If you can't make this move without lurching forward, then you're trying to drive your legs too hard during your downswing. But once you get the hang of this balanced swing, you'll make better contact more often. Good swing mechanics never change...
We just forget how to keep our balance when we try too hard. ;-)
Sunday, March 12, 2017
I Bet You've Never Heard This "Secret" Before!
Everybody's always looking for a secret, a silver bullet that will give them THE KEY to a great golf swing. Today I've got one that I doubt you have ever heard before.
It comes from a 2004 book by John W. Barrett called Such a Little Secret. It centers around an old BBC broadcast of the Open Championship, with commentary by Peter Alliss and Henry Longhurst, where they discussed "The Secret" as it was being demonstrated by some player who Barrett couldn't remember.
Anyway, according to the Dynamic Duo, "The Secret" is illustrated by this diagram from the book:

To restate "The Secret" so both lefties and righties can use it, "Swing around a still trailing ear." To quote Barrett:
Still, some of you might find some use in this idea of swinging around your trailing ear. You won't reverse pivot or sway during your backswing if you use it, but your head will still have some freedom of movement. You won't drive too hard toward the target on your downswing because, if you do, your head will get pushed away from the target and you're going to fall over backward. And you'll finish in a balanced position -- you need only to look at the drawings above to see that.
So while I don't believe this is "The Secret" to good golf, I do think it's an image that might help some of you who are struggling to stay steady over the ball during your swing. Take it for what it's worth.
It comes from a 2004 book by John W. Barrett called Such a Little Secret. It centers around an old BBC broadcast of the Open Championship, with commentary by Peter Alliss and Henry Longhurst, where they discussed "The Secret" as it was being demonstrated by some player who Barrett couldn't remember.
Anyway, according to the Dynamic Duo, "The Secret" is illustrated by this diagram from the book:
To restate "The Secret" so both lefties and righties can use it, "Swing around a still trailing ear." To quote Barrett:
In any focus of concentration, the smaller the focal point the greater is one's sensitivity to it. To continue to use the word ear would do, and in a television broadcast it was probably a more genteel choice than use of the vernacular. Distilling the focal point down to the quarter inch diameter of the aural canal, however, will give a golfer a far sharper image in the mind than the more vague outline of the whole of the right ear. [p57]Look, am I saying that this is "The Secret" to fixing your golf swing? Absolutely not. I don't believe there's one technique that will make you the next Jason Day or Rory McIlroy. If there's a secret, it lies in relaxation, balance and rhythm.
Still, some of you might find some use in this idea of swinging around your trailing ear. You won't reverse pivot or sway during your backswing if you use it, but your head will still have some freedom of movement. You won't drive too hard toward the target on your downswing because, if you do, your head will get pushed away from the target and you're going to fall over backward. And you'll finish in a balanced position -- you need only to look at the drawings above to see that.
So while I don't believe this is "The Secret" to good golf, I do think it's an image that might help some of you who are struggling to stay steady over the ball during your swing. Take it for what it's worth.
Tuesday, February 21, 2017
A Surprise Tip to Avoid "Getting Stuck"
When you study swing mechanics as much as I do, sometimes you experience a moment of serendipity. That is, two separate things that you thought had no connection suddenly slam into each other... and a little light bulb appears over your head. That happened to me Monday.

Michael Breed was on Morning Drive -- as he often is -- and was talking about DJ's change of direction at the top of his swing. Many players, Breed said, don't get a full shoulder turn like DJ. Instead, their shoulders stop and their arms just keep going, trying to make a longer swing. As a result, Breed said that their trailing elbows move too much behind them and they simply can't return them into the proper position in time to make their downswing. Their elbows literally "get stuck" behind them.
That's when my little light bulb lit up, and I decided this tip might help some of you.
In past posts I have mentioned that some players and instructors recommend pushing your trailing hand away from your head at the top of your backswing. This is supposed to help you keep more width in your swing, which should help you get more distance.
But on Monday morning I realized that, if you push your trailing hand away from your head at the top of your backswing -- that is, if you try to straighten your trailing elbow a little -- then your trailing elbow CAN'T move behind you at the top. Just try it. If you push the club away from you at the top of your backswing, your elbow HAS to move back into the proper position.
Lights suddenly went on. Voilà! No more getting stuck!
Mechanics don't get much simpler than that, folks. If you're getting stuck on your way down, just try to push your hands away from your head at the top. You'll get your trailing elbow back into position without any trouble at all. Problem solved.
I love serendipity.
The photo came from this page at golfchannel.com.
Michael Breed was on Morning Drive -- as he often is -- and was talking about DJ's change of direction at the top of his swing. Many players, Breed said, don't get a full shoulder turn like DJ. Instead, their shoulders stop and their arms just keep going, trying to make a longer swing. As a result, Breed said that their trailing elbows move too much behind them and they simply can't return them into the proper position in time to make their downswing. Their elbows literally "get stuck" behind them.
That's when my little light bulb lit up, and I decided this tip might help some of you.
In past posts I have mentioned that some players and instructors recommend pushing your trailing hand away from your head at the top of your backswing. This is supposed to help you keep more width in your swing, which should help you get more distance.
But on Monday morning I realized that, if you push your trailing hand away from your head at the top of your backswing -- that is, if you try to straighten your trailing elbow a little -- then your trailing elbow CAN'T move behind you at the top. Just try it. If you push the club away from you at the top of your backswing, your elbow HAS to move back into the proper position.
Lights suddenly went on. Voilà! No more getting stuck!
Mechanics don't get much simpler than that, folks. If you're getting stuck on your way down, just try to push your hands away from your head at the top. You'll get your trailing elbow back into position without any trouble at all. Problem solved.
I love serendipity.
The photo came from this page at golfchannel.com.
Tuesday, February 7, 2017
Sorting Out the Matsuyama Downswing
So you wonder if you should copy Hideki Matsuyama's pause at the top. (Let's be blunt here. It's not a pause, it's a full stop.) Instructor Michael Jacobs over at Golf Digest says you shouldn't copy the pause, but you should copy his hand action at the start of his downswing.
I'm going to suggest a modification to his instruction, one that will give you the same sort of action but with a much simpler motion. And I give you this suggestion based on my own experience.
You see, the motion Jacobs says Hideki makes is one that Davis Love was making when he first came out on tour... and Davis himself described it as "a slippery little move."

I don't have a copy of the magazine, but memory seems to say it was a Golf Magazine cover story in the mid- to late-1980s called The Secret Move. (But don't quote me on that. That kind of memory is a "slippery little" thing in itself.) And it detailed the technique, because Davis was not only long but he could create extra yardage when he needed it.
This move -- where you start your downswing by moving your hands away from both your body and the target -- widens your downswing, and does so in a way that increases your wrist cock on the way down. (I've written extensively about downcocks in this blog, often in relation to Inbee Park and J.B. Holmes.) Jacobs says you want to move your hands straight out from your body first, then start down. And if that sounds a little tricky, understand that it's basically the same move a fly fisherman makes when he casts his rod.
The reason it's a tricky move is that the fisherman casts his (or her) rod using only one hand, and in the direction he (or she) is facing. Coordinating a two-handed move away from your body IN THE OPPOSITE DIRECTION OF WHICH YOU'RE TURNING is extremely complex.
I know. I tried for quite a while to get that move down and discovered that Davis was right -- it IS a slippery little move. I finally gave up. HOWEVER...
You can get a similar effect with a much simpler move, one I use myself.
Most of you are bending your trailing elbow as you start down. DON'T DO IT. Instead, feel like you're straightening that elbow as you start down.
Instead of moving your hands out THEN down, you'll be moving them out AND down simultaneously. Instead of moving parallel to the ground and then dropping, it will feel like your hands are sliding down an incline as they move down. Then, when your hands are somewhere between shoulder and waist high, let that trailing elbow bend and smack that ball! You'll find that you get the same sort of result, but it will be a lot easier to do.
And, on the way down, you'll feel the increased pressure against your wrists as they retain their cock later into the downswing.
Just as a side note: Davis eventually said he had to reign this move in a little to gain more accuracy. So don't get upset if you pick up some distance but lose some control. There's a balance you'll have to find if you want to use this technique. But keeping your trailing elbow straighter as you start your downswing won't be as hard to control as that "slippery little move."
I'm going to suggest a modification to his instruction, one that will give you the same sort of action but with a much simpler motion. And I give you this suggestion based on my own experience.
You see, the motion Jacobs says Hideki makes is one that Davis Love was making when he first came out on tour... and Davis himself described it as "a slippery little move."
I don't have a copy of the magazine, but memory seems to say it was a Golf Magazine cover story in the mid- to late-1980s called The Secret Move. (But don't quote me on that. That kind of memory is a "slippery little" thing in itself.) And it detailed the technique, because Davis was not only long but he could create extra yardage when he needed it.
This move -- where you start your downswing by moving your hands away from both your body and the target -- widens your downswing, and does so in a way that increases your wrist cock on the way down. (I've written extensively about downcocks in this blog, often in relation to Inbee Park and J.B. Holmes.) Jacobs says you want to move your hands straight out from your body first, then start down. And if that sounds a little tricky, understand that it's basically the same move a fly fisherman makes when he casts his rod.
The reason it's a tricky move is that the fisherman casts his (or her) rod using only one hand, and in the direction he (or she) is facing. Coordinating a two-handed move away from your body IN THE OPPOSITE DIRECTION OF WHICH YOU'RE TURNING is extremely complex.
I know. I tried for quite a while to get that move down and discovered that Davis was right -- it IS a slippery little move. I finally gave up. HOWEVER...
You can get a similar effect with a much simpler move, one I use myself.
Most of you are bending your trailing elbow as you start down. DON'T DO IT. Instead, feel like you're straightening that elbow as you start down.
Instead of moving your hands out THEN down, you'll be moving them out AND down simultaneously. Instead of moving parallel to the ground and then dropping, it will feel like your hands are sliding down an incline as they move down. Then, when your hands are somewhere between shoulder and waist high, let that trailing elbow bend and smack that ball! You'll find that you get the same sort of result, but it will be a lot easier to do.
And, on the way down, you'll feel the increased pressure against your wrists as they retain their cock later into the downswing.
Just as a side note: Davis eventually said he had to reign this move in a little to gain more accuracy. So don't get upset if you pick up some distance but lose some control. There's a balance you'll have to find if you want to use this technique. But keeping your trailing elbow straighter as you start your downswing won't be as hard to control as that "slippery little move."
Tuesday, January 31, 2017
An Incredible Interview with Pete Cowen
Golf Digest has this amazing interview with Pete Cowen, called The Best Teacher No One Knows, a man who many consider to be one of the two best teachers in the game. (Butch Harmon is the other.) I have often used Cowen's thoughts on the swing in my posts, and this interview includes his thoughts on many of the game's top players.

Since I love using some of his thoughts -- after all, he doesn't get a lot of TV time here in America -- I'll give you just one of the interesting things you'll read in this article. He was asked who he thought had the best swing ever, and he said Sam Snead. That resonates with me because I've tried to use some of Sam's technique in my own books. Now listen to WHY he says Sam was the best:
As for his thoughts on Hogan... well, I'll let you read those yourself.
This will almost certainly be a controversial article amongst instructors. Trust me, you'll want to read this. It's not just instructive, it's entertaining.
Since I love using some of his thoughts -- after all, he doesn't get a lot of TV time here in America -- I'll give you just one of the interesting things you'll read in this article. He was asked who he thought had the best swing ever, and he said Sam Snead. That resonates with me because I've tried to use some of Sam's technique in my own books. Now listen to WHY he says Sam was the best:
MECHANICALLY, SAM EMBODIED ALMOST PERFECTLY MY CONCEPTION of the full-swing motion resembling a spiral staircase, going back and coming through. Sam's sequential coiling and uncoiling was timeless and without flaw. There was none of this lateral-motion stuff, nor was it simple turn then unturn. Sam's engine was much more dynamic than that. You could imprint a silhouette of Sam, and it would be a great imprint for anyone to follow today. There's only one player today who comes close to matching it, and that's Henrik Stenson. (emphasis is mine)Cowen is different from many American teachers simply because he doesn't like the modern over-emphasis on lateral motion to start the downswing. And if you watch Stenson swing, you'll see that he doesn't have a lot of lateral movement toward the target either.
As for his thoughts on Hogan... well, I'll let you read those yourself.
This will almost certainly be a controversial article amongst instructors. Trust me, you'll want to read this. It's not just instructive, it's entertaining.
Subscribe to:
Posts (Atom)