With Georgia Hall having won the Ricoh Women's British Open this past weekend, I thought it might be good to take a quick look at her swing. She did this video on driving for the LET.
I'm not going to focus on any specific tip from this video. Rather, I want you to notice what she calls this video -- "The Stable Drive." As she says, too many players move too much over the ball, and that makes it hard to get consistent and predictable hits.
Georgia's not talking about being immovable over the ball; she specifically says that she works on rhythm, which requires you to stay relaxed. We all tend to get so tight! We freeze over the ball during address, then we jerk around when we finally try to move and we wonder why we can't stay steady over the ball.
If we want to get better, we have to learn to relax and move freely during our swings. And as she says, trying to hit the ball too hard works against that. It's better to accept what feels like a little less clubhead speed at first while we learn how to "swing casual," to borrow an old Han Solo line, then just move a little quicker as we get more relaxed.
Hey, it worked for Georgia Hall. It couldn't hurt to try it, could it?

Showing posts with label followthrough. Show all posts
Showing posts with label followthrough. Show all posts
Tuesday, August 7, 2018

Saturday, August 4, 2018
Martin Chuck on "Hand-Controlled Pivots" (Video)
I'll have to come back to this video at a later date, but I've been looking for something like this. Revolution Golf instructor Martin Chuck explains how to let your hands control your pivot to create clubhead speed.
Chuck says this will help older golfers, but note also that he references how Bobby Jones used this technique, so it's not just for older folks!
Most modern players are taught to use their pivot to control their hands (because they tend to overuse their hands), but this is the exact opposite of that technique (although most pros do use a combination of both). I've written about using the momentum of your hands and arms to help pull you through to your finish; Chuck uses the word inertia, which is the same thing.
It's basic physics: An object in motion tends to remain in motion. By using your hands to get the club moving, the club can help you keep moving all the way through your swing. You start the motion by bending your trailing elbow on the backswing, then you straighten it on the downswing just after you strike the ball. This straightening is what creates the momentum to pull you through to your finish.
As I said earlier, I'll come back to this video in a few days. But for now, be aware that this is the same sort of thing you learn when you use the L-to-L drill that I mention every so often. (Here's a link to one of the posts that includes video showing how it's done.) Combine the info from Chuck's video with the L-to-L drill, and you should find it pretty easy to make a hand-controlled pivot.
I know I say this a lot, but the golf swing isn't all that hard. It's just that we spend too much time focusing on trying to do things that would happen on their own if we just focused on the important things. This is one of those important things that will help simplify the game for you.
Chuck says this will help older golfers, but note also that he references how Bobby Jones used this technique, so it's not just for older folks!
Most modern players are taught to use their pivot to control their hands (because they tend to overuse their hands), but this is the exact opposite of that technique (although most pros do use a combination of both). I've written about using the momentum of your hands and arms to help pull you through to your finish; Chuck uses the word inertia, which is the same thing.
It's basic physics: An object in motion tends to remain in motion. By using your hands to get the club moving, the club can help you keep moving all the way through your swing. You start the motion by bending your trailing elbow on the backswing, then you straighten it on the downswing just after you strike the ball. This straightening is what creates the momentum to pull you through to your finish.
As I said earlier, I'll come back to this video in a few days. But for now, be aware that this is the same sort of thing you learn when you use the L-to-L drill that I mention every so often. (Here's a link to one of the posts that includes video showing how it's done.) Combine the info from Chuck's video with the L-to-L drill, and you should find it pretty easy to make a hand-controlled pivot.
I know I say this a lot, but the golf swing isn't all that hard. It's just that we spend too much time focusing on trying to do things that would happen on their own if we just focused on the important things. This is one of those important things that will help simplify the game for you.
Sunday, July 22, 2018
Martin Hall's Swing Plane Drill (Video)
I think Martin has the name for this drill wrong. It's his Night School video from early June, which I think can be very useful to you... but I still think the name's wrong.
While Martin says this drill helps with your swing plane -- and it might help you get a more neutral swing plane, as opposed to an in-to-out or out-to-in plane -- I think its real value is in helping you get a fuller shoulder turn with your backswing and a fuller turn into your finish.
In order to get your lead arm to match that 45° backswing shaft, you have to get a good 90° shoulder turn on the way back. And to get your trailing arm to match that 45° finish position shaft, you need to get your upper body turning all the way through (belt buckle to the target, if you will) when you hit the ball.
Will that help your swing plane? Probably. But if it does, it's because getting your shoulders back and around so you "finish your backswing" and "swing to a full finish" primarily helps you get the ball on line better.
While Martin says this drill helps with your swing plane -- and it might help you get a more neutral swing plane, as opposed to an in-to-out or out-to-in plane -- I think its real value is in helping you get a fuller shoulder turn with your backswing and a fuller turn into your finish.
In order to get your lead arm to match that 45° backswing shaft, you have to get a good 90° shoulder turn on the way back. And to get your trailing arm to match that 45° finish position shaft, you need to get your upper body turning all the way through (belt buckle to the target, if you will) when you hit the ball.
Will that help your swing plane? Probably. But if it does, it's because getting your shoulders back and around so you "finish your backswing" and "swing to a full finish" primarily helps you get the ball on line better.
Thursday, July 5, 2018
Why You Shouldn't Always Copy the Pros (Video)
In this short video from Wednesday's Morning Drive, GOLFTEC instructor Patrick Nuber shows the difference between the ways pros and amateurs use their wrists during their swing. It might convince you that the L-to-L drill isn't something you should use... but you'd be wrong. I want to show you why copying the pros isn't always a good thing, and how "the numbers" don't always tell the whole story.
The L-to-L drill gives you the same result during the backswing that his video diagrams show. There's no conflict there.
At around the 2:20 mark Nuber shows the difference between how pros and amateurs' wrists behave as they move up to the finish. His numbers show that the amateurs bend their wrists upward much more at the halfway up point. That's the position you'll get if you use the L-to-L drill. Nuber says the pros keep their wrists much straighter at the halfway point, and that this creates more clubhead speed.
There's a lot that he doesn't say here. Let me explain some of it to you.
This is one of the great problems with our reliance on numbers. Numbers may not lie, but numbers mean nothing until they are interpreted... and interpretations lie all the time. Don't try to duplicate numbers. Focus instead on learning to play golf, and in time the numbers will take care of themselves.
The L-to-L drill gives you the same result during the backswing that his video diagrams show. There's no conflict there.
At around the 2:20 mark Nuber shows the difference between how pros and amateurs' wrists behave as they move up to the finish. His numbers show that the amateurs bend their wrists upward much more at the halfway up point. That's the position you'll get if you use the L-to-L drill. Nuber says the pros keep their wrists much straighter at the halfway point, and that this creates more clubhead speed.
There's a lot that he doesn't say here. Let me explain some of it to you.
- First off, bear in mind that Nuber's diagrams are taken from a full swing, not the half swing that you use in the L-to-L drill. I don't care how strong they are, no pro will make a full-speed half swing and stop with the shaft at the angle in his diagram.
- Here's something important that you can see in the diagrams. If you look closely at the two figures -- not at the wrists, but at the upper bodies of the figures -- you'll see that the pro figure has turned his chest toward the target far more than the amateur figure. If the upper body position isn't clear to you, just look at the legs and hips -- it's VERY noticeable there. That means that the amateur figure has stopped turning, so the arms have slowed down and the wrists HAVE to bend upward. THAT'S the cause, the reason the amateur loses clubhead speed, not the wrist bend. The extra wrist bend is merely the result of his body slowing down too early.
- Here's a corollary to the last point: If you keep turning your body as you swing into the finish, your wrists won't bend upward until much later in the followthrough. In other words, the pro arm position Nuber shows will happen automatically if you turn properly.
- Did you notice that Nuber says the lesser wrist bend causes the ball to fly lower? Most amateurs are struggling to hit the ball higher and get more spin on wedge shots. The last thing they need is to consciously try and hit the ball lower. They should focus on creating as much clubhead speed as possible before they start trying to hit the ball lower.
- Finally, think about your short game. When you want to hit the ball lower AND SHORTER, you cut off the finish -- exactly what his "point the shaft" drill teaches you. If you want to increase your distance, this isn't the way to do it.
This is one of the great problems with our reliance on numbers. Numbers may not lie, but numbers mean nothing until they are interpreted... and interpretations lie all the time. Don't try to duplicate numbers. Focus instead on learning to play golf, and in time the numbers will take care of themselves.
Friday, June 29, 2018
Andrew Rice on Clubface Control (Video)
This is one of the short Revolution Golf videos that GC is putting up at their website, and this one was posted Thursday. It focuses on keeping control of your clubface at impact, which can help you if you're working with the swing thoughts from the Bubba post earlier this week.
Rice says that you want to make sure you keep your spine angle at impact. That doesn't mean that you have to "keep your head down"; rather, it means that you don't want to "stand up" when you swing down. How is this different from "using the ground"? When "using the ground" only your lead knee straightens at impact, while when you "stand up" BOTH KNEES straighten at impact. Simple, right?
If you "stay down" as Rice suggests, you'll be forced to turn your shoulders and hips into your followthrough, which will help you square the clubface at impact.
Now, you may not realize it, but what Rice is teaching here isn't something new to you. In fact, if you've been following this blog for a while, you will probably recognize his drill as yet another version of the multipurpose L-to-L drill which I frequently recommend. Here's a link to my most recent post on a specialized version of the L-to-L drill, and that post has a link to another post with more basic versions of the drill.
Rice's version will teach you how to use the L-to-L drill with another swing thought. And the more things you can learn from a single drill, the simpler your practice becomes and the more likely you are to develop a simple, easily repeated swing.
Rice says that you want to make sure you keep your spine angle at impact. That doesn't mean that you have to "keep your head down"; rather, it means that you don't want to "stand up" when you swing down. How is this different from "using the ground"? When "using the ground" only your lead knee straightens at impact, while when you "stand up" BOTH KNEES straighten at impact. Simple, right?
If you "stay down" as Rice suggests, you'll be forced to turn your shoulders and hips into your followthrough, which will help you square the clubface at impact.
Now, you may not realize it, but what Rice is teaching here isn't something new to you. In fact, if you've been following this blog for a while, you will probably recognize his drill as yet another version of the multipurpose L-to-L drill which I frequently recommend. Here's a link to my most recent post on a specialized version of the L-to-L drill, and that post has a link to another post with more basic versions of the drill.
Rice's version will teach you how to use the L-to-L drill with another swing thought. And the more things you can learn from a single drill, the simpler your practice becomes and the more likely you are to develop a simple, easily repeated swing.
Wednesday, May 30, 2018
Mike Malaska's Split Grip L-to-L Drill (Video)
With the Stanley Cup playoffs underway here in America, I thought it might be neat to give you a hockey-style drill. And since one of my favorite drills is the L-to-L drill (here's just one of the posts I've done on it, with two versions of the drill from Mike Malaska) and I also found a hockey-style L-to-L drill from Mike Malaska himself...
One thing I want you to note here is that Malaska says you can actually hit balls with this drill! That's unusual for hockey-style drills because of the split grip. While you wouldn't want to do this on the course, it's a great way to really feel how the wrists should work in order to uncock late in the downswing. After all, that's how you create clubhead speed.
Pay close attention to Malaska's hands when using the split grip. You'll note that his hands get very close to his thighs during impact, which will help you create the correct wrist motion with a split grip. Even with a split grip, you want to keep your wrists and forearms as relaxed as practical; that also helps you create clubhead speed.
Also notice that you have to get a good shoulder turn into your finish in order to keep your wrists from rolling over at impact. This is important if you want to create a lot of clubhead speed with a regular grip as well.
I love the fact that Malaska gives you so many views of how this drill looks from the viewpoint of the finish. You can use a mirror to help you get the correct plane -- that is, no forearm roll at the finish -- if you're having trouble.
I realize that, for many of you, this drill will have limited use. But if you're really having trouble getting the correct feel in the L-to-L drill, this may be the ticket for you.
One thing I want you to note here is that Malaska says you can actually hit balls with this drill! That's unusual for hockey-style drills because of the split grip. While you wouldn't want to do this on the course, it's a great way to really feel how the wrists should work in order to uncock late in the downswing. After all, that's how you create clubhead speed.
Pay close attention to Malaska's hands when using the split grip. You'll note that his hands get very close to his thighs during impact, which will help you create the correct wrist motion with a split grip. Even with a split grip, you want to keep your wrists and forearms as relaxed as practical; that also helps you create clubhead speed.
Also notice that you have to get a good shoulder turn into your finish in order to keep your wrists from rolling over at impact. This is important if you want to create a lot of clubhead speed with a regular grip as well.
I love the fact that Malaska gives you so many views of how this drill looks from the viewpoint of the finish. You can use a mirror to help you get the correct plane -- that is, no forearm roll at the finish -- if you're having trouble.
I realize that, for many of you, this drill will have limited use. But if you're really having trouble getting the correct feel in the L-to-L drill, this may be the ticket for you.
Friday, May 25, 2018
Martin Hall's "Buckle Before Buttons" Drill (Video)
This is one of Martin Hall's Home School videos, and it is a deceptively simple way to learn what a proper weight shift feels like.
Martin doesn't say this, but you can see it if you watch closely. When you set up next to the wall, you want your lead foot only an inch or two from it -- and when I tested it, I think just an inch worked best.
And note this little tip which you can see but Martin doesn't mention: When you touch your belt buckle to the wall and keep your chest from touching the wall, your spine is pretty much vertical. (There's a very slight arch but that is caused by clasping your hands behind your back, which pulls your shoulders back slightly. That's a naturally balanced position, similar to a soldier standing "at ease.") This drill teaches you to make a straight finish that takes pressure off your back.
Beyond that, it's all pretty simple. In order to (a) touch your belt buckle to the wall while (b) keeping your chest from touching the wall, you have to shift your weight onto your lead foot during your "downswing." If you hang back on your trailing foot, you will not be able to do this drill!
What this drill does is give you a "visual" feel for your finish -- and by visuaI I mean that you can actually see and measure what the desired finish position is like, if you want or need to. You can feel your buckle touching the wall, you can see that your chest doesn't touch, and you can use a mirror to see how close to vertical your back is when you do those two things. That way, you can guarantee that you get in the same position each time you do this drill, and that means you'll get the desired result much more easily and learn to repeat it more quickly. That's what makes a great drill!
Martin doesn't say this, but you can see it if you watch closely. When you set up next to the wall, you want your lead foot only an inch or two from it -- and when I tested it, I think just an inch worked best.
And note this little tip which you can see but Martin doesn't mention: When you touch your belt buckle to the wall and keep your chest from touching the wall, your spine is pretty much vertical. (There's a very slight arch but that is caused by clasping your hands behind your back, which pulls your shoulders back slightly. That's a naturally balanced position, similar to a soldier standing "at ease.") This drill teaches you to make a straight finish that takes pressure off your back.
Beyond that, it's all pretty simple. In order to (a) touch your belt buckle to the wall while (b) keeping your chest from touching the wall, you have to shift your weight onto your lead foot during your "downswing." If you hang back on your trailing foot, you will not be able to do this drill!
What this drill does is give you a "visual" feel for your finish -- and by visuaI I mean that you can actually see and measure what the desired finish position is like, if you want or need to. You can feel your buckle touching the wall, you can see that your chest doesn't touch, and you can use a mirror to see how close to vertical your back is when you do those two things. That way, you can guarantee that you get in the same position each time you do this drill, and that means you'll get the desired result much more easily and learn to repeat it more quickly. That's what makes a great drill!
Sunday, April 15, 2018
Martin Hall on Getting More Distance (Video)
Hall did this video last week to help older players get more distance, but not understanding how to use your hands and arms keeps a lot of players from hitting it out there. This video is a very simple explanation of how it works.
Okay, there are two parts to this, and if you're too fixated on swinging around your body you'll never get the hang of it.
And yes, I have more videos to help you. I've posted them in past posts, so here are the links.
The first post teaches you how that upward cocking motion creates your "top of backswing" position. It's called Using Your Hands in the Takeaway and it features K.J. Choi's instructor Steven Bann. As I said, it will help you understand how that upward cocking action creates the so-called "textbook" position at the top.
And the other post is called Jim Flick on the TWO Pendulums in Your Swing, which I also referenced in the Nick Faldo post from yesterday. That "L-to-L" drill is a great way to learn that lead wrist upcock motion that Martin Hall is talking about.
Yes, I know I recommend a lot of drills over and over, but that's because they are proven drills that teach a number of skills and they work for almost everybody. Work with them and you'll find out for yourself.
And in this case, you'll pick up some extra distance, even if you aren't particularly old. Yet.
Okay, there are two parts to this, and if you're too fixated on swinging around your body you'll never get the hang of it.
- First, you cock your trailing elbow up and down.
- Second, you cock your lead wrist up and down.
And yes, I have more videos to help you. I've posted them in past posts, so here are the links.
The first post teaches you how that upward cocking motion creates your "top of backswing" position. It's called Using Your Hands in the Takeaway and it features K.J. Choi's instructor Steven Bann. As I said, it will help you understand how that upward cocking action creates the so-called "textbook" position at the top.
And the other post is called Jim Flick on the TWO Pendulums in Your Swing, which I also referenced in the Nick Faldo post from yesterday. That "L-to-L" drill is a great way to learn that lead wrist upcock motion that Martin Hall is talking about.
Yes, I know I recommend a lot of drills over and over, but that's because they are proven drills that teach a number of skills and they work for almost everybody. Work with them and you'll find out for yourself.
And in this case, you'll pick up some extra distance, even if you aren't particularly old. Yet.
Thursday, March 22, 2018
Martin Hall's Sponge Drill (Video)
This is a super-short Home School video from Martin on how to use a sponge -- no club -- to keep your hands, arms and shoulders in sync during your swing.
The drill is self-explanatory, but here's why it works: The flat side of the sponge should stay parallel to your chest throughout the drill. You're using a half-swing, about shoulder height. If the sponge starts to tilt so one edge or the other is angled, then your arms and chest aren't swinging together.
This drill will show you whether you're "getting stuck" (your trailing elbow collapses before you hit the ball) or "scooping" (your lead elbow collapses as you hit the ball). It's a nice visual way to get feedback, even without a club.
The drill is self-explanatory, but here's why it works: The flat side of the sponge should stay parallel to your chest throughout the drill. You're using a half-swing, about shoulder height. If the sponge starts to tilt so one edge or the other is angled, then your arms and chest aren't swinging together.
This drill will show you whether you're "getting stuck" (your trailing elbow collapses before you hit the ball) or "scooping" (your lead elbow collapses as you hit the ball). It's a nice visual way to get feedback, even without a club.
Wednesday, February 14, 2018
Dustin Johnson on Practicing Wedges (Video)
This video is four years old. That's when DJ went an entire calendar year without a PGA Tour title (2014) and started working on his wedge game in earnest. It's interesting to hear what he was focusing on during his practice sessions.
Incredibly simple, don't you think? Although we know he started working with a Trackman in order to learn how far he hit his wedges, the actual mechanics he worked on were just getting his takeaway on line and making sure he didn't stop his upper body from moving after he hit the ball.
I hope all of you are beginning to notice how many pros are starting to emphasize what we often call the "belly button to target" move. If they do it, they don't flip their wrists at impact. For the pros, that means they don't hit duck hooks or double crosses.
For most of you reading this, it will help you hit the ball more solidly and consistently. That will improve both your distance and your accuracy. That's reason enough to take this tip seriously.
Incredibly simple, don't you think? Although we know he started working with a Trackman in order to learn how far he hit his wedges, the actual mechanics he worked on were just getting his takeaway on line and making sure he didn't stop his upper body from moving after he hit the ball.
I hope all of you are beginning to notice how many pros are starting to emphasize what we often call the "belly button to target" move. If they do it, they don't flip their wrists at impact. For the pros, that means they don't hit duck hooks or double crosses.
For most of you reading this, it will help you hit the ball more solidly and consistently. That will improve both your distance and your accuracy. That's reason enough to take this tip seriously.
Tuesday, December 26, 2017
Manuel de la Torre on Weight Shift
Manuel de la Torre died in 2016 but his impact on professional and amateur golf was huge. His book Understanding the Golf Swing is considered a classic. Today's quote is from that book.
de la Torre's approach to weight shift was a bit different than that of most modern instructors. But no matter what swing method you use, it's worth considering if what he says might help you.
What this teaching can do is make it much easier for you to return the club to the ball consistently. And if trying it just quiets your lower body a bit so you don't slide back and forth so much, you'll find it's well worth the effort.
de la Torre's approach to weight shift was a bit different than that of most modern instructors. But no matter what swing method you use, it's worth considering if what he says might help you.
A common theory claims that the weight should be shifted to the back foot in the backswing. I am convinced that the weight should not be transferred to the back foot in the backswing.Yes, de la Torre may sound a bit out-of-step with many modern instructors. And it's true that much of his teaching method is based on teachings from the legendary Ernest Jones. But what he says here does simplify your swing a lot, and it doesn't preclude your use of modern lower body power techniques.
We are all looking for consistency in our games and we should swing the golf club so that it is easy to meet the golf ball with the face of the club at a right angle to the target line. As mentioned before, the golf club is describing a circle when it is swung. Being a circle, it must have a center. If we were describing a circle with a compass, the first thing we would do would be to set the center. If this center moves to different locations, it is impossible to return to the starting point.
The same thing happens in the golf swing. When the center is allowed to move to the right through a weight shift to the back foot, that center must be re-established prior to contacting the golf ball or square impact is impossible. You will observe some of our fine tournament players who do shift their center to the back foot and play well. But bear in mind that those players play every day and practice for hours every day. They have developed the timing and the extra move to achieve square impact. However, some of those same tournament players at times cannot find the timing to meet the ball properly and, especially with the driver, they become very inaccurate and miss more fairways than they should.
If the center is maintained, and the hands are placed on the club in a neutral position, the club can be returned to the exact address position from the end of the backswing and it will be square to the target line without any necessity to manipulate it to square. It is one less thing with which the player has to be concerned.
I contend that the weight should be maintained equally divided on the feet until after impact and then the centrifugal force will transfer its weight to the front foot. [p63-64]
What this teaching can do is make it much easier for you to return the club to the ball consistently. And if trying it just quiets your lower body a bit so you don't slide back and forth so much, you'll find it's well worth the effort.
Sunday, October 22, 2017
Kevin Weeks on Body Rotation (Video)
I bet you'll look at this video and say, "Oh, I know that drill." No, you don't -- at least, you don't understand it. Instructor Kevin Weeks has given this drill a twist (pun intended) that you won't believe until you do it.
The standard version of the drill goes something like this: Place a glove or something under your lead arm, in your armpit, and hit balls. It's okay for the glove to drop to the ground when you reach the top of your finish. This teaches you connection.
THAT IS NOT THIS DRILL. Let me explain the Weeks version to you.
You use a towel and fold it up. You want it so that if your arm separates from your chest too much, that baby is going to open up even if it doesn't drop. Then you hold your club in your lead hand ONLY and make swings without dropping the towel at any point in your swing. Why?
Because this drill isn't about connection. It's about body rotation.
You have trouble with slices because you don't finish your rotation during your downswing. You have trouble with chicken wings because you don't finish your rotation during your downswing. You have trouble with weight shift because you don't finish your rotation during your downswing.
Do you understand? Many of your swing problems happen because you don't finish your rotation during your downswing. This drill teaches you what complete rotation feels like.
Weeks says you should only hit the ball around 25 yards or so. That creates enough speed to pull your arm away from your body if you don't rotate completely to your finish, but not so much that your arm goes high and you drop the towel. Your elbow will have to fold and your body will have to turn in order to keep that towel in place.
Learning what rotation to a complete finish feels like is vital if you're going to develop consistency in your shotmaking. This is a great drill that will help you. Give it a try!
The standard version of the drill goes something like this: Place a glove or something under your lead arm, in your armpit, and hit balls. It's okay for the glove to drop to the ground when you reach the top of your finish. This teaches you connection.
THAT IS NOT THIS DRILL. Let me explain the Weeks version to you.
You use a towel and fold it up. You want it so that if your arm separates from your chest too much, that baby is going to open up even if it doesn't drop. Then you hold your club in your lead hand ONLY and make swings without dropping the towel at any point in your swing. Why?
Because this drill isn't about connection. It's about body rotation.
You have trouble with slices because you don't finish your rotation during your downswing. You have trouble with chicken wings because you don't finish your rotation during your downswing. You have trouble with weight shift because you don't finish your rotation during your downswing.
Do you understand? Many of your swing problems happen because you don't finish your rotation during your downswing. This drill teaches you what complete rotation feels like.
Weeks says you should only hit the ball around 25 yards or so. That creates enough speed to pull your arm away from your body if you don't rotate completely to your finish, but not so much that your arm goes high and you drop the towel. Your elbow will have to fold and your body will have to turn in order to keep that towel in place.
Learning what rotation to a complete finish feels like is vital if you're going to develop consistency in your shotmaking. This is a great drill that will help you. Give it a try!
Friday, July 21, 2017
Jordan Spieth Talks About His Swing (Video)
Nearly two months ago, Golf Digest posted a video with Jordan Spieth explaining his "chicken wing" move and why he thinks it works. Since he's leading The Open after the first round, I feel this is a good time to take a peek at it.
This video does a couple of things. It not only explains why Jordan makes the move -- it's how he keeps the face square longer, to improve his accuracy -- but it explains the science behind why you should pay more attention to face angle. You'll learn a lot.
But I want you to understand something that this video glosses over. It's implied that Jordan's success with this move is because it's a better way to be accurate. That's just wrong. If that were true, someone would have discovered that fact long ago because "chicken wings" aren't new. This move definitely works for Jordan, and would likely work for a large number of players.
That doesn't mean it's right for everybody, any more than Sergio's swing is right for everybody or Jim Furyk's swing is right for everybody.
If you take a look at past history, you'll see this fascination with the hottest players' swings at work over and over. For example:
If you want to play a fade, Jordan's "chicken wing" may be exactly what you need. But if you're after a draw, you might want to keep looking.
Don't let the popular fad of the moment determine how you swing a club. The way Jordan swings might be right for you, or it might not. But no matter whose swing is being praised, always choose your approach based on knowledge, not fads.
This video does a couple of things. It not only explains why Jordan makes the move -- it's how he keeps the face square longer, to improve his accuracy -- but it explains the science behind why you should pay more attention to face angle. You'll learn a lot.
But I want you to understand something that this video glosses over. It's implied that Jordan's success with this move is because it's a better way to be accurate. That's just wrong. If that were true, someone would have discovered that fact long ago because "chicken wings" aren't new. This move definitely works for Jordan, and would likely work for a large number of players.
That doesn't mean it's right for everybody, any more than Sergio's swing is right for everybody or Jim Furyk's swing is right for everybody.
If you take a look at past history, you'll see this fascination with the hottest players' swings at work over and over. For example:
- Instructors initially said Ben Hogan's swing was "too flat"... until he started beating everybody with it. Then they said it's the best swing ever.
- They said Jack Nicklaus's "flying elbow" in his backswing was wrong... until he started beating everybody. Then they called it a power move.
- It wasn't that long ago that you were supposed to keep both feet firmly on the ground during your swing... until guys like Bubba started knocking the cover off the ball. Now they call it "using the ground."
If you want to play a fade, Jordan's "chicken wing" may be exactly what you need. But if you're after a draw, you might want to keep looking.
Don't let the popular fad of the moment determine how you swing a club. The way Jordan swings might be right for you, or it might not. But no matter whose swing is being praised, always choose your approach based on knowledge, not fads.
Thursday, June 8, 2017
Cameron McCormick on Reverse Chaining
It's a short Golf Digest article, but Cameron McCormick's instruction on using reverse chaining to shape your shots is something you might want to try.
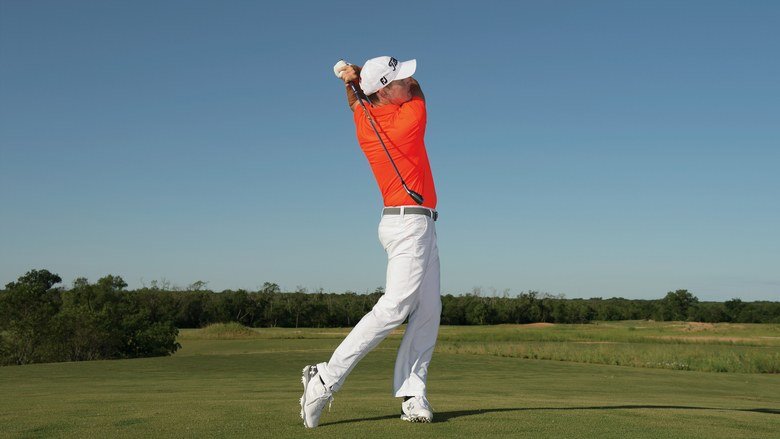
This isn't a new idea, but it's the first time I've heard it called reverse chaining. McCormick explains it this way:
Best of all, it's a swing thought you can try, no matter what swing method you use. Such thoughts are hard to find these days.
This isn't a new idea, but it's the first time I've heard it called reverse chaining. McCormick explains it this way:
The concept is that if you know the type of finish position your body and club should be in to create a certain ball flight, your mind intuitively adapts, so your body and club know how to move to reach that destination. In other words, the downswing and through-swing happen simply as a result of trying to get into the proper finish position.You've heard of it too, haven't you? The nice thing about this article is that he explains the finish positions you need for three different shots in a very simple, easy-to-picture way.
- For a draw: a high-C finish (pictured above)
- For a knockdown: stop short
- For a fade: swing low and left
Best of all, it's a swing thought you can try, no matter what swing method you use. Such thoughts are hard to find these days.
Sunday, March 12, 2017
I Bet You've Never Heard This "Secret" Before!
Everybody's always looking for a secret, a silver bullet that will give them THE KEY to a great golf swing. Today I've got one that I doubt you have ever heard before.
It comes from a 2004 book by John W. Barrett called Such a Little Secret. It centers around an old BBC broadcast of the Open Championship, with commentary by Peter Alliss and Henry Longhurst, where they discussed "The Secret" as it was being demonstrated by some player who Barrett couldn't remember.
Anyway, according to the Dynamic Duo, "The Secret" is illustrated by this diagram from the book:

To restate "The Secret" so both lefties and righties can use it, "Swing around a still trailing ear." To quote Barrett:
Still, some of you might find some use in this idea of swinging around your trailing ear. You won't reverse pivot or sway during your backswing if you use it, but your head will still have some freedom of movement. You won't drive too hard toward the target on your downswing because, if you do, your head will get pushed away from the target and you're going to fall over backward. And you'll finish in a balanced position -- you need only to look at the drawings above to see that.
So while I don't believe this is "The Secret" to good golf, I do think it's an image that might help some of you who are struggling to stay steady over the ball during your swing. Take it for what it's worth.
It comes from a 2004 book by John W. Barrett called Such a Little Secret. It centers around an old BBC broadcast of the Open Championship, with commentary by Peter Alliss and Henry Longhurst, where they discussed "The Secret" as it was being demonstrated by some player who Barrett couldn't remember.
Anyway, according to the Dynamic Duo, "The Secret" is illustrated by this diagram from the book:
To restate "The Secret" so both lefties and righties can use it, "Swing around a still trailing ear." To quote Barrett:
In any focus of concentration, the smaller the focal point the greater is one's sensitivity to it. To continue to use the word ear would do, and in a television broadcast it was probably a more genteel choice than use of the vernacular. Distilling the focal point down to the quarter inch diameter of the aural canal, however, will give a golfer a far sharper image in the mind than the more vague outline of the whole of the right ear. [p57]Look, am I saying that this is "The Secret" to fixing your golf swing? Absolutely not. I don't believe there's one technique that will make you the next Jason Day or Rory McIlroy. If there's a secret, it lies in relaxation, balance and rhythm.
Still, some of you might find some use in this idea of swinging around your trailing ear. You won't reverse pivot or sway during your backswing if you use it, but your head will still have some freedom of movement. You won't drive too hard toward the target on your downswing because, if you do, your head will get pushed away from the target and you're going to fall over backward. And you'll finish in a balanced position -- you need only to look at the drawings above to see that.
So while I don't believe this is "The Secret" to good golf, I do think it's an image that might help some of you who are struggling to stay steady over the ball during your swing. Take it for what it's worth.
Thursday, March 9, 2017
Tom Stickney on How to Stop Slicing Your Irons (Video)
Golf Magazine has an article called 3 Easy Keys for Sticking Your Irons... but that's not what I'm interested in today. It's not a bad article, but I'm more interested in the video tip that heads the article.
The video is called Irons: Eliminate Your Slice for Good. It's a tip from Golf Magazine Top100 Teacher Tom Stickney. I've embedded it here; you'll probably want to run it full screen.
You've probably heard this tip a hundred times -- keep your upper arm close to your body as you hit the ball. But I want to give you a new thought that might help you make more progress when using this tip.
Stickney says those sliced irons are caused by a disconnect -- your arm separates from your body -- so you want to keep your armpit tight against your body. A common drill for this, which Stickney doesn't mention here, is putting a glove or towel in your armpit and trying to hit the ball before you drop said glove or towel.
But let's look at this a bit closer.
When you hold something in your armpit, you're keeping your entire upper arm against your chest. The key here is keeping your lead elbow close to your side. Your elbow is closer to the club, so keeping your elbow close to your side should actually be easier than holding something in your armpit.
So try this drill: Make some practice swings -- half-swings are fine -- by letting your lead elbow stay close to your body all the way back, even letting it bend. (This is easier if you keep both elbows close against your body and let them both bend. That's an old Hogan drill.) Then let both elbows straighten as you swing the club down toward impact. In order to keep your lead elbow close to your side, you'll need to keep turning your body toward the target after impact and let your lead elbow bend as the club comes up. This will teach you the correct body movement to keep your lead elbow close.
You see, your lead elbow moves away from your body -- it disconnects, as Stickney says -- because you stop turning your body before you actually hit the ball. If you keep turning your upper body and hips -- because they all need to keep moving -- your lead elbow will stay closer to your body and you won't get that huge disconnect.
It shouldn't take you long to get comfortable with this drill. It will probably feel a bit weird if you haven't been turning through impact, but that won't last long. Then you can start making your regular backswing, and letting your lead elbow move closer to your side at impact. Then you can feel as if your lead elbow is bending as you finish, just as you did in the drill.
Soon you'll not only stop slicing your irons, you'll pick up some distance as well. It'll help with your woods also. It's just good technique.
The video is called Irons: Eliminate Your Slice for Good. It's a tip from Golf Magazine Top100 Teacher Tom Stickney. I've embedded it here; you'll probably want to run it full screen.
You've probably heard this tip a hundred times -- keep your upper arm close to your body as you hit the ball. But I want to give you a new thought that might help you make more progress when using this tip.
Stickney says those sliced irons are caused by a disconnect -- your arm separates from your body -- so you want to keep your armpit tight against your body. A common drill for this, which Stickney doesn't mention here, is putting a glove or towel in your armpit and trying to hit the ball before you drop said glove or towel.
But let's look at this a bit closer.
When you hold something in your armpit, you're keeping your entire upper arm against your chest. The key here is keeping your lead elbow close to your side. Your elbow is closer to the club, so keeping your elbow close to your side should actually be easier than holding something in your armpit.
So try this drill: Make some practice swings -- half-swings are fine -- by letting your lead elbow stay close to your body all the way back, even letting it bend. (This is easier if you keep both elbows close against your body and let them both bend. That's an old Hogan drill.) Then let both elbows straighten as you swing the club down toward impact. In order to keep your lead elbow close to your side, you'll need to keep turning your body toward the target after impact and let your lead elbow bend as the club comes up. This will teach you the correct body movement to keep your lead elbow close.
You see, your lead elbow moves away from your body -- it disconnects, as Stickney says -- because you stop turning your body before you actually hit the ball. If you keep turning your upper body and hips -- because they all need to keep moving -- your lead elbow will stay closer to your body and you won't get that huge disconnect.
It shouldn't take you long to get comfortable with this drill. It will probably feel a bit weird if you haven't been turning through impact, but that won't last long. Then you can start making your regular backswing, and letting your lead elbow move closer to your side at impact. Then you can feel as if your lead elbow is bending as you finish, just as you did in the drill.
Soon you'll not only stop slicing your irons, you'll pick up some distance as well. It'll help with your woods also. It's just good technique.
Thursday, August 25, 2016
Brian Jacobs on Fixing Your Plane (Video)
I don't post a lot of in-depth instruction about swing plane. It's not that plane isn't important -- I just think we're too obsessed with it, and most of the drills are too nitpicky. But I don't mind putting up something that's both simple and useful.
GCA Coach Brian Jacobs did a really short video that gives you a simple drill to improve your swing plane. I especially like it because it doesn't require training aids, which means you can use it on the course during a round if necessary. Here, take a look:
All you do is take your finish position -- that is, your "pose" after the ball is long gone -- and then, without changing your arms or shoulders, turn 180° so you mirror that position at the top of your backswing.
I know it sounds ridiculously simple, but don't underestimate this simple drill. If your "top of backswing" position mirrors your finish position, and if you make sure they match when you make your swing from backswing to finish, you're on plane. It just doesn't get any simpler than that.
And you can use this drill anywhere you can swing a club, which means you can do it in a few spare minutes every day in your backyard. Just do the drill a few times -- pose your finish, mirror it to the backswing, then swing back to the finish -- then see if you can swing to that top of backswing position from your address position. Once you can do that slowly, gradually speed it up to your normal speed.
If your swing plane is off, this drill will help you. Just add it to your practice routine and see.
GCA Coach Brian Jacobs did a really short video that gives you a simple drill to improve your swing plane. I especially like it because it doesn't require training aids, which means you can use it on the course during a round if necessary. Here, take a look:
All you do is take your finish position -- that is, your "pose" after the ball is long gone -- and then, without changing your arms or shoulders, turn 180° so you mirror that position at the top of your backswing.
I know it sounds ridiculously simple, but don't underestimate this simple drill. If your "top of backswing" position mirrors your finish position, and if you make sure they match when you make your swing from backswing to finish, you're on plane. It just doesn't get any simpler than that.
And you can use this drill anywhere you can swing a club, which means you can do it in a few spare minutes every day in your backyard. Just do the drill a few times -- pose your finish, mirror it to the backswing, then swing back to the finish -- then see if you can swing to that top of backswing position from your address position. Once you can do that slowly, gradually speed it up to your normal speed.
If your swing plane is off, this drill will help you. Just add it to your practice routine and see.
Saturday, October 31, 2015
An Old Johnny Miller Drill for More Clubhead Speed
Wow, this is some old video footage! Here's Johnny Miller demonstrating what he calls "two secret positions that every Tour pro knows." What he's talking about is how your wrists uncock at impact to create clubhead speed. Then he shows footage of Jack Nicklaus doing it when he hits the ball.
The drill is simple, so simple that you might be inclined to ignore it. Don't -- it will help you more than you know.
In many ways this is no different from some of my old Route 67 posts about "the swoosh at the bottom." (You can find those posts by clicking the Route 67 Posts button just under the header, if you're interested.)
This drill exaggerates the movement a bit because a short swing requires more effort to uncock your wrists at impact than a full swing does. But if you practice this drill using a short swing, you'll find it's much easier to do it with a full swing. Plus you can do it in your backyard, using tees as targets instead of balls to help you get familiar with the move before you take it to the range.
And for you Michael Breed fans, it will help you get that delayed swooshing noise just past the ball that he keeps trying to teach you.
The drill is simple, so simple that you might be inclined to ignore it. Don't -- it will help you more than you know.
In many ways this is no different from some of my old Route 67 posts about "the swoosh at the bottom." (You can find those posts by clicking the Route 67 Posts button just under the header, if you're interested.)
This drill exaggerates the movement a bit because a short swing requires more effort to uncock your wrists at impact than a full swing does. But if you practice this drill using a short swing, you'll find it's much easier to do it with a full swing. Plus you can do it in your backyard, using tees as targets instead of balls to help you get familiar with the move before you take it to the range.
And for you Michael Breed fans, it will help you get that delayed swooshing noise just past the ball that he keeps trying to teach you.
Thursday, April 16, 2015
Brian Manzella on How Jordan Squares the Clubface
Here's a new instructional video from golf.com showing how Jordan Spieth squares the face of his club during impact. (Alas, there's no way to embed it in this post. Just pop over to golf.com to see it.) Brian Manzella has a drill to help you understand how Jordan is moving.
But I think there's a bit more to this than Brian says, although he definitely shows what's happening. Let me explain.

What I want to focus on is that bent lead elbow at impact and beyond. Everybody who analyzes Jordan's swing points out this somewhat unorthodox position; most players try to have the lead elbow straight (or nearly so) when they hit the ball. Let me show you how this affects Jordan's fundamentals.
The neutral/weaker lead hand position simply gets the back of Jordan's hand to face the same direction as the clubface.
While Manzella is correct that Jordan rotates the club a bit, it's not as much as you might think. Remember, Manzells's standing straight up when he demonstrates this; if he were bent over as Jordan would be when he turns, that 30-degree face angle would make the toe point almost straight up in the air. The angle is created by a bowed wrist, not a twisting forearm
The key is that bent lead elbow. When Jordan bends that elbow and pulls it against his side, it causes his upper arm to act like a hinge, swinging his forearm like a door. In essence, he "slams the door" on the ball so that the back of his lead hand -- and therefore the face of the club -- is pointed directly at the target. That bent elbow forces him to square the clubface. That's the key movement.
In fact, I bet you'll find that you can get the exact same result -- that square clubface -- without consciously trying to manipulate the clubface at all. By keeping that slight bend in the lead elbow, it's extremely easy to think about hitting the ball with the back of your lead hand, or the palm of your trailing hand if you prefer, or with both of them (that's what I do).
Here's a drill to try for comparison: Keep your upper lead arm close to your side and let your lead forearm lay across your chest, pointed back at that halfway position Brian is starting from. From there, don't move your upper arm -- just swing your forearm (and club) away from your body so it points straight out toward the ball. See how it feels like it's swinging on a hinge? That's the basic movement; it's just that your elbow is a bit farther from your body at the halfway down point in your actual swing.
(If that drill seems unclear, let me know in the comments and I'll see if I can't add some photos to illustrate the move.)
Think about backhanding a tennis shot -- most people instinctively bend their elbow when they make the swing to take some stress off the arm. Bending that elbow helps create the leverage to get the racket around their body so they can hit the ball. This is the same thing!
And if you try making swings this way, don't be surprised if you eventually start straightening your lead elbow more as you become more relaxed making this movement. The key here is that bending your lead elbow as you swing creates rotation at your shoulder joint -- not a twist with your forearm -- that helps you get the clubface squared up. It not only simplifies the motion, but it takes a lot less effort than flipping the club. Give it a try and see if it doesn't help.
But I think there's a bit more to this than Brian says, although he definitely shows what's happening. Let me explain.
What I want to focus on is that bent lead elbow at impact and beyond. Everybody who analyzes Jordan's swing points out this somewhat unorthodox position; most players try to have the lead elbow straight (or nearly so) when they hit the ball. Let me show you how this affects Jordan's fundamentals.
The neutral/weaker lead hand position simply gets the back of Jordan's hand to face the same direction as the clubface.
While Manzella is correct that Jordan rotates the club a bit, it's not as much as you might think. Remember, Manzells's standing straight up when he demonstrates this; if he were bent over as Jordan would be when he turns, that 30-degree face angle would make the toe point almost straight up in the air. The angle is created by a bowed wrist, not a twisting forearm
The key is that bent lead elbow. When Jordan bends that elbow and pulls it against his side, it causes his upper arm to act like a hinge, swinging his forearm like a door. In essence, he "slams the door" on the ball so that the back of his lead hand -- and therefore the face of the club -- is pointed directly at the target. That bent elbow forces him to square the clubface. That's the key movement.
In fact, I bet you'll find that you can get the exact same result -- that square clubface -- without consciously trying to manipulate the clubface at all. By keeping that slight bend in the lead elbow, it's extremely easy to think about hitting the ball with the back of your lead hand, or the palm of your trailing hand if you prefer, or with both of them (that's what I do).
Here's a drill to try for comparison: Keep your upper lead arm close to your side and let your lead forearm lay across your chest, pointed back at that halfway position Brian is starting from. From there, don't move your upper arm -- just swing your forearm (and club) away from your body so it points straight out toward the ball. See how it feels like it's swinging on a hinge? That's the basic movement; it's just that your elbow is a bit farther from your body at the halfway down point in your actual swing.
(If that drill seems unclear, let me know in the comments and I'll see if I can't add some photos to illustrate the move.)
Think about backhanding a tennis shot -- most people instinctively bend their elbow when they make the swing to take some stress off the arm. Bending that elbow helps create the leverage to get the racket around their body so they can hit the ball. This is the same thing!
And if you try making swings this way, don't be surprised if you eventually start straightening your lead elbow more as you become more relaxed making this movement. The key here is that bending your lead elbow as you swing creates rotation at your shoulder joint -- not a twist with your forearm -- that helps you get the clubface squared up. It not only simplifies the motion, but it takes a lot less effort than flipping the club. Give it a try and see if it doesn't help.
Thursday, March 12, 2015
Another Drill to Help You Stop Slicing
This little video is from last week's School of Golf. Martin Hall has two drills to help you square up the club face using what he calls EDPU -- elbow down, palm up. First, here's the video:
Now what he's doing here may seem pretty obvious, but it's easy to miss it. In all likelihood you're going to focus on forearm rotation to get that palm pointing up when you do these drills, but that's wrong. The key is the elbow down part. Let me explain what's happening by stretching out the swing a bit.
When you make your normal downswing and your hands are around waist high, your lead arm is a little below parallel to the ground and your lead elbow is pointed down toward the ground. That means that the back of your lead hand is facing away from your body -- that is, if someone were standing on the other side of the ball facing you, they would see the back of your lead hand. So far so good.
The problem is that most slicers now pull their lead elbow toward the target. As a result, the lead elbow is chicken-winged away from the body and the back of the lead hand continues to point mostly away from your body. This is the problem, and I'm going to show you why right now.
If you stick your lead arm out so that your hand is in that waist high downswing position and then just swing your hand and arm away from your body as if your lead arm were a door -- keeping your lead arm parallel to the ground -- the back of your lead hand will face the target when your arm points straight out over the ball. Your lead shoulder acts like a hinge, and that's what keeps the lead elbow pointed down.
Then, as your trailing elbow straightens, it's going to force your lead elbow to bend -- your upper arm will stay very close to your side -- and your lead hand will rotate enough to turn the palm up; that will cause the toe of the club to turn toward the target. Remember, your body is turning as all this happens, so the drill Martin showed is an exaggeration of what actually happens. But even with a massive forearm twist you won't get that palm up consistently if you chicken-wing your lead elbow away from your body.
So it will help you do these drills if you keep your lead elbow close to your body while you do them. It's almost as if your upper arm -- from shoulder to elbow -- is rolling against your chest and side as you swing the club past your body. The momentum of the club will pull your lead elbow and arm away from your body during the followthrough when the time is right for it to do so.
Once you get used to that "rolling upper arm" motion, you'll find it very easy to get into that "elbow down palm up" followthrough position that Martin is talking about. That's because you'll be using the big muscles of your upper body to get the rotation and not the smaller (and weaker) muscles in your forearms and wrists.
Now what he's doing here may seem pretty obvious, but it's easy to miss it. In all likelihood you're going to focus on forearm rotation to get that palm pointing up when you do these drills, but that's wrong. The key is the elbow down part. Let me explain what's happening by stretching out the swing a bit.
When you make your normal downswing and your hands are around waist high, your lead arm is a little below parallel to the ground and your lead elbow is pointed down toward the ground. That means that the back of your lead hand is facing away from your body -- that is, if someone were standing on the other side of the ball facing you, they would see the back of your lead hand. So far so good.
The problem is that most slicers now pull their lead elbow toward the target. As a result, the lead elbow is chicken-winged away from the body and the back of the lead hand continues to point mostly away from your body. This is the problem, and I'm going to show you why right now.
If you stick your lead arm out so that your hand is in that waist high downswing position and then just swing your hand and arm away from your body as if your lead arm were a door -- keeping your lead arm parallel to the ground -- the back of your lead hand will face the target when your arm points straight out over the ball. Your lead shoulder acts like a hinge, and that's what keeps the lead elbow pointed down.
Then, as your trailing elbow straightens, it's going to force your lead elbow to bend -- your upper arm will stay very close to your side -- and your lead hand will rotate enough to turn the palm up; that will cause the toe of the club to turn toward the target. Remember, your body is turning as all this happens, so the drill Martin showed is an exaggeration of what actually happens. But even with a massive forearm twist you won't get that palm up consistently if you chicken-wing your lead elbow away from your body.
So it will help you do these drills if you keep your lead elbow close to your body while you do them. It's almost as if your upper arm -- from shoulder to elbow -- is rolling against your chest and side as you swing the club past your body. The momentum of the club will pull your lead elbow and arm away from your body during the followthrough when the time is right for it to do so.
Once you get used to that "rolling upper arm" motion, you'll find it very easy to get into that "elbow down palm up" followthrough position that Martin is talking about. That's because you'll be using the big muscles of your upper body to get the rotation and not the smaller (and weaker) muscles in your forearms and wrists.
Subscribe to:
Posts (Atom)