Here's a short video from PGA teaching pro Zach Allen and Golf Tips Magazine to help you improve your driver grip.
This is a simple way to get your lead hand grip out of your palm. By creating an "L" at waist height with the club and your trailing hand, and THEN gripping the club with your lead hand, it forces you to grip the club more in your lead hand's fingers.
Many of you may not need this tip. But if it's a problem for you, this is a simple way to break a bad habit.

Showing posts with label grip. Show all posts
Showing posts with label grip. Show all posts
Saturday, June 2, 2018

Thursday, May 31, 2018
Martin Hall Remembers Manuel de la Torre (Video)
One of my favorite golf teachers is the late Manuel de la Torre, who taught many pros like LPGA legend Carol Mann (who died just a week or so ago). However, he devoted most of his life to teaching amateurs and is best known for the simplicity of his teaching methods.
Martin Hall did this short video focusing on just one of de la Torre's many teachings about the golf swing, and this one may help many of you hit better shots with very little practice.
"Leave it alone." It's deceptively simple advice that few players consciously work on these days.
When you tighten your grip on the club during your swing, you change the position of the clubface and sometimes even your swing plane... and you do it without ever consciously trying to. If you don't understand why, just sit down in an armchair, rest your elbow and forearm on the chair's arm and make a loose fist. Then rhythmically tighten and loosen that fist -- your forearm will bounce up and down on the chair arm like you're having convulsions!
While tightening and loosening your grip during your swing won't have quite as dramatic a result, it will cause unintended changes in clubface angles. To battle this, you MUST CONSCIOUSLY try to keep a nice, even grip and forearm tension throughout your swing. I can tell you from personal experience that it helps to try and relax all of your upper body muscles -- shoulders, neck, back and even jaw muscles -- as you swing.
As Martin says, you won't be able to keep that tension perfectly the same all the way through your swing. But your goal is to minimize the changes. It will not only improve your ball contact (and as a result, your distance and accuracy), but it will improve your rhythm, the smoothness of your change of direction at the top of your swing, and even help minimize the stress on your back.
And once you get good at it, you'll find that you can make a faster swing without losing control of the club. Sounds crazy, I know, but it's true. Proper rhythm does that for you.
So give it a try. You might be surprised at the results.
Martin Hall did this short video focusing on just one of de la Torre's many teachings about the golf swing, and this one may help many of you hit better shots with very little practice.
"Leave it alone." It's deceptively simple advice that few players consciously work on these days.
When you tighten your grip on the club during your swing, you change the position of the clubface and sometimes even your swing plane... and you do it without ever consciously trying to. If you don't understand why, just sit down in an armchair, rest your elbow and forearm on the chair's arm and make a loose fist. Then rhythmically tighten and loosen that fist -- your forearm will bounce up and down on the chair arm like you're having convulsions!
While tightening and loosening your grip during your swing won't have quite as dramatic a result, it will cause unintended changes in clubface angles. To battle this, you MUST CONSCIOUSLY try to keep a nice, even grip and forearm tension throughout your swing. I can tell you from personal experience that it helps to try and relax all of your upper body muscles -- shoulders, neck, back and even jaw muscles -- as you swing.
As Martin says, you won't be able to keep that tension perfectly the same all the way through your swing. But your goal is to minimize the changes. It will not only improve your ball contact (and as a result, your distance and accuracy), but it will improve your rhythm, the smoothness of your change of direction at the top of your swing, and even help minimize the stress on your back.
And once you get good at it, you'll find that you can make a faster swing without losing control of the club. Sounds crazy, I know, but it's true. Proper rhythm does that for you.
So give it a try. You might be surprised at the results.
Wednesday, May 30, 2018
Mike Malaska's Split Grip L-to-L Drill (Video)
With the Stanley Cup playoffs underway here in America, I thought it might be neat to give you a hockey-style drill. And since one of my favorite drills is the L-to-L drill (here's just one of the posts I've done on it, with two versions of the drill from Mike Malaska) and I also found a hockey-style L-to-L drill from Mike Malaska himself...
One thing I want you to note here is that Malaska says you can actually hit balls with this drill! That's unusual for hockey-style drills because of the split grip. While you wouldn't want to do this on the course, it's a great way to really feel how the wrists should work in order to uncock late in the downswing. After all, that's how you create clubhead speed.
Pay close attention to Malaska's hands when using the split grip. You'll note that his hands get very close to his thighs during impact, which will help you create the correct wrist motion with a split grip. Even with a split grip, you want to keep your wrists and forearms as relaxed as practical; that also helps you create clubhead speed.
Also notice that you have to get a good shoulder turn into your finish in order to keep your wrists from rolling over at impact. This is important if you want to create a lot of clubhead speed with a regular grip as well.
I love the fact that Malaska gives you so many views of how this drill looks from the viewpoint of the finish. You can use a mirror to help you get the correct plane -- that is, no forearm roll at the finish -- if you're having trouble.
I realize that, for many of you, this drill will have limited use. But if you're really having trouble getting the correct feel in the L-to-L drill, this may be the ticket for you.
One thing I want you to note here is that Malaska says you can actually hit balls with this drill! That's unusual for hockey-style drills because of the split grip. While you wouldn't want to do this on the course, it's a great way to really feel how the wrists should work in order to uncock late in the downswing. After all, that's how you create clubhead speed.
Pay close attention to Malaska's hands when using the split grip. You'll note that his hands get very close to his thighs during impact, which will help you create the correct wrist motion with a split grip. Even with a split grip, you want to keep your wrists and forearms as relaxed as practical; that also helps you create clubhead speed.
Also notice that you have to get a good shoulder turn into your finish in order to keep your wrists from rolling over at impact. This is important if you want to create a lot of clubhead speed with a regular grip as well.
I love the fact that Malaska gives you so many views of how this drill looks from the viewpoint of the finish. You can use a mirror to help you get the correct plane -- that is, no forearm roll at the finish -- if you're having trouble.
I realize that, for many of you, this drill will have limited use. But if you're really having trouble getting the correct feel in the L-to-L drill, this may be the ticket for you.
Friday, March 30, 2018
Xander Schauffele on Hitting It Long
Xander Schauffele did an article for Golf Digest on some of his tips for getting big distance when you're a smaller person. You can follow the link to learn some of his tips and feels, but I want to point out one specific thing he says which is different from what you may have heard most instructors say.

Xander uses a neutral grip, which goes against the advice most instructors give -- that is, that a strong grip makes for a more powerful strike. But Xander's definition of a neutral grip is very interesting. Here's what he says:
He says these things will help you to get better hand action so you hit the ball farther. He certainly ought to know!
There are several interesting ideas in Xander's article, but this one about the grip really stood out to me. It's pretty clear that Xander is trying to move freely, not "hold" anything in an attempt to create some special position. That mindset change in and of itself might help you get more distance than you do now.
Xander uses a neutral grip, which goes against the advice most instructors give -- that is, that a strong grip makes for a more powerful strike. But Xander's definition of a neutral grip is very interesting. Here's what he says:
One thing that will help you unleash that power at the right moment is your grip. Mine is neutral. For a stock shot, I see only one knuckle on my glove hand when I look down. This grip allows me to hit draws or fades when I want to. It also lets me release the clubhead into the ball like I’m hammering that nail. If your grip is too strong, you can’t fully release the clubhead, typically resulting in a loss of speed. And a grip that’s too weak makes it tough to square the clubface at impact, so you lose control.You get that? He can only see ONE knuckle, not two or three. Take a good look at that photo above from the article. Xander also notes that he wants to club shaft almost vertical at address for a drive, not leaning forward. That's important because it works with the one-knuckle grip to get the hands in the proper position at impact. Make sure you read what he says about the one-knuckle grip, shaft lean and ball position at address so you don't turn your grip too weak.
He says these things will help you to get better hand action so you hit the ball farther. He certainly ought to know!
There are several interesting ideas in Xander's article, but this one about the grip really stood out to me. It's pretty clear that Xander is trying to move freely, not "hold" anything in an attempt to create some special position. That mindset change in and of itself might help you get more distance than you do now.
Sunday, March 4, 2018
Brandel Chamblee on "the Magic Move" (Video)
I know many of you don't care for Brandel Chamblee, and you know I don't agree with him on everything either. But this short video he did on what he calls "the Magic Move" is a good explanation of what many successful pros have done to get distance.
I want to focus on that "straight right leg" he mentions. (And add that Arnold Palmer may have been the best example of it.) Bear in mind that you aren't necessarily "locking" that knee; it may have a slight flex in it. But it's a very slight flex -- slight enough that it almost feels locked, but without the stress you feel in a locked knee joint. It's straight enough that it doesn't bend easily.
If you let your trailing knee straighten during your backswing, it may sound as if it will limit your ability to launch into your downswing. What it actually does is stop you from "spinning out" at the top as you start down:
And as Brandel points out, it's really hard to argue with the success of the players who have used it. It's one of those techniques that I put in the "it's worth a try" category, because if it won't work with your swing, you'll know pretty quick and won't have to waste a lot of time trying it.
But if it works for you... well, Arnie had a pretty good record.
I want to focus on that "straight right leg" he mentions. (And add that Arnold Palmer may have been the best example of it.) Bear in mind that you aren't necessarily "locking" that knee; it may have a slight flex in it. But it's a very slight flex -- slight enough that it almost feels locked, but without the stress you feel in a locked knee joint. It's straight enough that it doesn't bend easily.
If you let your trailing knee straighten during your backswing, it may sound as if it will limit your ability to launch into your downswing. What it actually does is stop you from "spinning out" at the top as you start down:
- That straightness makes a fuller hip turn feel more natural, and it almost doesn't require any extra thought on your part. (Automatic moves -- when they're correct -- almost always improve your ballstriking.)
- It makes it easier to stay relatively still over the ball (no sway during your backswing) without putting extra stress on your back.
- Since you have to turn your hips to start the downswing rather than pushing hard with your thigh, it smooths out the start of your downswing.
- You don't have to "drive" forward to get a weight shift to your lead foot -- a straight trailing leg forces you to "fall onto" your lead foot. Instant weight shift!
- And once your upper body begins to turn with your hips during your downswing, your trailing knee will start to bend automatically. That puts you in position to start using the ground to push up at impact, but it keeps the "push up" under control so you don't overdo it and mis-hit the ball.
And as Brandel points out, it's really hard to argue with the success of the players who have used it. It's one of those techniques that I put in the "it's worth a try" category, because if it won't work with your swing, you'll know pretty quick and won't have to waste a lot of time trying it.
But if it works for you... well, Arnie had a pretty good record.
Friday, November 17, 2017
Claude Brousseau on Giving Up Control (Video)
GC posted this drill from instructor Claude Brousseau that teaches you to gain control of your swing by giving up control. Sound crazy? It's not. It's about learning how to trust your natural movements.
What this drill teaches you is what instructors used to call "feeling the clubhead." By using this drill, you'll learn how to feel pressure changes in the shaft at the change of direction, which is caused by the clubhead's reaction to gravity as it changes direction from backswing to downswing.
Really, it's much easier to feel than it is to explain.
By taking your trailing hand off the club's handle and placing it on top of your lead hand, those pressure changes will be focused on your lead wrist. Brousseau wants you to swing slowly because, if you aren't used to it, your first experiments with this drill might HURT if you swing fast. You don't want to injure your wrist, so take it easy to start!
Once you get used to this, however, you'll be able to speed up your swing. Why? Because this drill teaches you how to feel the rhythm of your swing. Once you start to feel it, you'll learn how to move with it and create more speed with less effort.
Btw, you may be surprised to find that this drill helps you square up the clubface better than you usually do. That's because the natural movement of your lead arm will square up the clubface if you don't impede it. That's where the often-heard advice to "control the club with your lead side" comes from. But actually, you just need to let both hands and arms work together... which is exactly what this drill teaches you.
Try it without a golf ball at first. When you feel more comfortable with the drill, try hitting some golf balls. I think you'll have fun working with this drill, and your ball striking will improve.
What this drill teaches you is what instructors used to call "feeling the clubhead." By using this drill, you'll learn how to feel pressure changes in the shaft at the change of direction, which is caused by the clubhead's reaction to gravity as it changes direction from backswing to downswing.
Really, it's much easier to feel than it is to explain.
By taking your trailing hand off the club's handle and placing it on top of your lead hand, those pressure changes will be focused on your lead wrist. Brousseau wants you to swing slowly because, if you aren't used to it, your first experiments with this drill might HURT if you swing fast. You don't want to injure your wrist, so take it easy to start!
Once you get used to this, however, you'll be able to speed up your swing. Why? Because this drill teaches you how to feel the rhythm of your swing. Once you start to feel it, you'll learn how to move with it and create more speed with less effort.
Btw, you may be surprised to find that this drill helps you square up the clubface better than you usually do. That's because the natural movement of your lead arm will square up the clubface if you don't impede it. That's where the often-heard advice to "control the club with your lead side" comes from. But actually, you just need to let both hands and arms work together... which is exactly what this drill teaches you.
Try it without a golf ball at first. When you feel more comfortable with the drill, try hitting some golf balls. I think you'll have fun working with this drill, and your ball striking will improve.
Tuesday, November 7, 2017
A Quick Look at Shanshan Feng's Swing (Videos)
Shanshan Feng (aka Jenny Money) has moved up to #3 in the Rolex World Rankings this week, less than a quarter point behind long-hitting Sung Hyun Park.. I thought it might be instructive to take yet another look at one of the simplest yet most effective swings in women's golf.
This first video shows her swing from straight on, and it includes a slo-mo view of her hands at impact.
And this second video shows her swing from a variety of angles.
Let me point out a few simple things you can learn from Shanshan -- simple things that you can put into action immediately.
And bear in mind that Shanshan is notorious for NOT PRACTICING. If you want a dependable swing that doesn't need a lot of attention, you could do a lot worse than copying Jenny Money!
This first video shows her swing from straight on, and it includes a slo-mo view of her hands at impact.
And this second video shows her swing from a variety of angles.
Let me point out a few simple things you can learn from Shanshan -- simple things that you can put into action immediately.
- Simple setup. Note that her lead wrist is bent a bit more than most teachers would recommend, but that's because she has the butt end of the shaft pointing at her belly button. In other words, she has the end of the shaft pointing at the center of her body, so it's pointing at her spine.
- She cocks the club a bit earlier than some players, but there's nothing contrived here. She just takes it back in a way that feels comfortable to her, so it's consistent.
- Her backswing isn't extremely long, even with a driver -- it looks more like a three-quarter swing -- but she gets a good shoulder turn and she doesn't slide away from the ball.
- Yes, she starts down by moving her hips forward... but no, she doesn't make some powerful forward thrust with her hips. Physics demand that your lower body has to move first in order to start your downswing, but Shanshan doesn't exaggerate the move. She just moves in a natural way, stepping from her trail foot to her lead foot as she turns toward the target.
- She really uses her hands, arms and shoulders, so her wrists uncock as she hits the ball. The shaft is pointing at her belly button at impact, just the way she set up to the ball. She isn't worried about getting her wrists in some special position; she just points the shaft straight at the ball.
- Her footwork is very simple during her downswing. Again, all she does is just step from her trail foot to her lead foot as her shoulders turn completely into her finish. Since she doesn't stop her shoulders from turning, the club doesn't flip over as she hits the ball. As a result, the ball flies pretty straight.
And bear in mind that Shanshan is notorious for NOT PRACTICING. If you want a dependable swing that doesn't need a lot of attention, you could do a lot worse than copying Jenny Money!
Friday, April 14, 2017
Getting the Right Grip for Your Swing
Golf Digest posted an article called Match Your Swing to Your Body Like Sergio Garcia. You might not realize it but this article is about matching your grip to your swing. The article explains how that works with Sergio's grip, but the real meat of this article is the short explanation of how you can find the right grip for you.
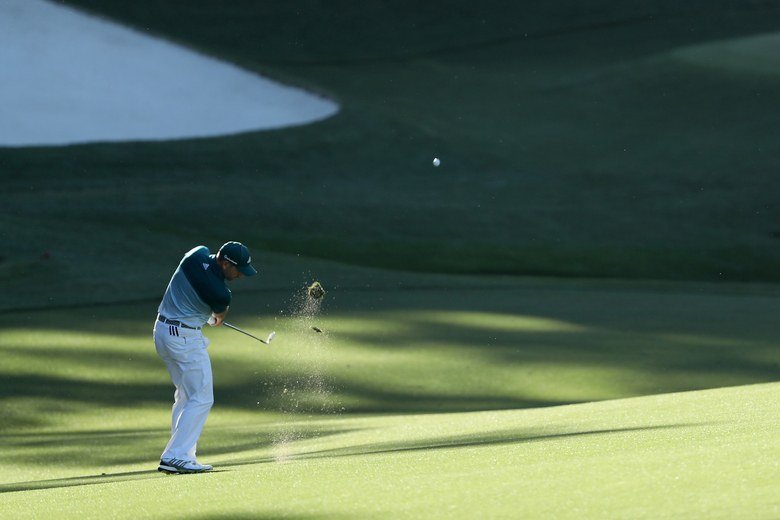
Here's the basic test. Note that when the text says to hold the club in your right hand, it means your TRAILING hand:
Here's the basic test. Note that when the text says to hold the club in your right hand, it means your TRAILING hand:
Hold a club in just your right hand, first with an extremely strong grip (where your hand is under the bottom of the handle). Make some half speed swings and notice if the face rapidly closes, stays square or tends to stay open. Do the same exercise with a neutral grip (on the side of the handle) and a weak one (with the hand more on top). The grip that produces the most square, natural-feeling release is going to be the best one for you.
"Once you've found the right one, use that as your right hand grip," says [Top50 Teacher Mike] Adams. "It dictates the direction of the hinge. It will dictate what your right elbow does, and what your path does. You don't have to think about it. Each of us has a pattern that fits us best."
You'll want to read the entire article to understand how this can help you. There's a full explanation of Sergio's grip, but the key here is that your trailing hand grip determines the direction that you'll hinge the club in your backswing -- on an upright, neutral or flat plane. It should be obvious that if you're making a flat swing but hinging the club in an upright plane, you're going to need compensations in your downswing.
And compensations just make it harder to hit good shots.
It's a good article that covers some instruction that isn't often talked about -- and does so in a clear, understandable way. Check it out!
Wednesday, February 15, 2017
Michelle Wie Finally Gets to the Claw
Well, now you have something to watch for at the Women's Australian Open this week. It appears that Michelle Wie has finally gone to the claw.
Golf Digest has a short article about it, including Wie's responses to questions about the change. The gist of it all is that the tabletop method is out -- at least for now -- and the claw is in. But as we all know, Michelle is an inveterate experimenter. I wonder how long this change will last?
BTW, the first round of the ISPS Handa Women's Australian Open is listed to start at midnight ET tonight and run until 6am ET tomorrow morning, then there's a highlight show (at least that's what it appears to be) at noon ET tomorrow.
Wie says bye to the 'tabletop', hello to 'the claw'. https://t.co/VasOfq74Sw pic.twitter.com/xs5LDrwqAe— #WomensAusOpen (@WomensAusOpen) February 14, 2017
Golf Digest has a short article about it, including Wie's responses to questions about the change. The gist of it all is that the tabletop method is out -- at least for now -- and the claw is in. But as we all know, Michelle is an inveterate experimenter. I wonder how long this change will last?
BTW, the first round of the ISPS Handa Women's Australian Open is listed to start at midnight ET tonight and run until 6am ET tomorrow morning, then there's a highlight show (at least that's what it appears to be) at noon ET tomorrow.
Thursday, October 6, 2016
The Problem with Copying Rory and Jason's Swings
It's been a couple weeks now since I did a post called
How You Squeeze the Club's Handle Matters. At the end of it I said you needed some time to digest what was in it, and that I would come back and explain what players like Rory McIlroy and Jason Day are trying to do, and why it's so hard. Of course, we've had the Tour Championship and the Ryder Cup since then, so you should have had time to think about what I wrote in that original post.
Now it's time for me to make good on my promise... and making good on it means this is a fairly long post. I'm sorry, but there's no way around it.
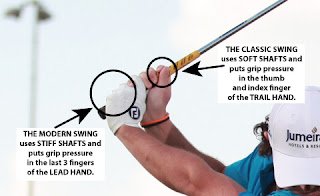
You may remember the photo below, which was the first of three in that post. Classic swings and modern swings focus the grip pressure on different parts of the handle, and this photo shows that difference. As I said in that post, this difference has everything to do with the equipment -- the classic swing uses soft shafts, the modern swing uses stiff shafts. And the other photos showed how this simple change affects the hinging action of the wrists during the swing.
Now let's take a look at how these changes, both in equipment and therefore grip pressure, have caused the swing to evolve. You may need to refer back to the other post because I'm not going to repeat all of that information again. But it's not hard to follow along, because this is all very logical.
And if you pay attention, you'll understand why some of the "swing advice" you often hear doesn't help you at all.
All of these changes -- equipment, grip pressure, etc. -- have a number of effects on your swing, but one in particular is important to this conversation, and that's what I'll call your spherical spine axis. Yeah, I know that's a strange term to use, but I want you to imagine a ball joint similar to the ones you have in your shoulders. Those joints allow more than just a simple back-and-forth motion, or an up-and-down motion, or even the rotational twisting motion you use when you twist open a door knob. They allow you to move in all three of those axes. You might think of them as spherical joints.
When you swing your golf club, you get movement on a variety of axes as well. We talk about maintaining your spine tilt during your swing -- that's the angle at which you lean toward the ball. But you also have a sort of pivoting motion where your hips move back and forth along your target line; that's how you create your weight shift and allow your chest to "open" a bit at the top of your backswing and finish. And then there's the rotation of your shoulders as you create your coil. In an efficient swing, the pivot point of all three are very near each other, a point that is most easily understood as being somewhere along the length of your spine.
That point is what I'm calling your spherical spine axis, which I will abbreviate as SSA for the rest of this post. And that point has moved as the golf swing has evolved.
I want you to imagine a letter T. The crossbar of it reaches between your shoulders, and the downward bar runs down your spine. Can you imagine that?
In the classic swing, your SSA is located roughly where the two bars connect -- that is, right at the base of your neck. The swinging motion used with softer shafts doesn't create as much leverage because it's way too easy to overload soft shafts. By creating a high SSA, the amount of leverage is minimized. And that high SSA is in the natural location for the classic swinging motion.
How many of you have been told to "keep your head still"? That's more of a classic swing idea. Just think about it for a minute. With your SSA so close to your head, your head isn't going to move around very much in your swing. If it does, you're moving your upper body a lot... and that means you're moving your SSA around. In a well-made classic swing, your head stays relatively quiet during the swing.
Many of you are familiar with Ernest Jones. In fact, most modern instructors believe he teaches the classic swing and they base their criticism of classic technique on his teachings. But Jones doesn't teach classic swing for soft shafts. Rather, Ernest Jones tried to adapt the classic swing to stiff shafts. It never became popular because the SSA of a classic swing is too high to create the necessary leverage for a stiff shaft.
Nelson bent both knees toward the target to create load; he still wasn't particularly long but was unbelievably accurate. Snead bent the knees in opposite directions -- the infamous "Snead Squat" -- which created a greater loading on the club and gave him much more distance. And why did this work?
The increased knee action -- and this was primarily knee action, a slight downward flex with an upward push (ie, they straightened their lead knee at impact) created a bit more forward hip movement. The net effect of this action was to lower the SSA down the spine slightly. (The head moved a bit more as well. "Keep your head still" became less useful as a swing thought! At this point, teachers began to recommend a slight head movement away from the ball at impact.)
It wasn't a huge change, but it was enough to load the stiffer shafts of the time and create more distance. Even in the mid-1950s, the great player and teacher Tommy Armour recommended in his book How to Play Your Best Golf All the Time that weekend players should get softer shafts than they believed they needed. Softer shafts meant greater distance with less effort, so weekend players could focus more on making good swings than on generating distance.
I should point out that golfers using the "drop down" loading technique don't seem to have had the back problems we see nowadays. Just look at how long -- and how well -- players from that generation were able to play without debilitating back pain. Players like Tom Watson, Jack Nicklaus and Arnold Palmer -- each with his own very distinctive swing -- rarely if ever had to withdraw from tournaments because of recurring pain.
And then Hogan showed up, focusing on the concept we now call connection. And the practical result of keeping the upper arms so close to the player's side during the downswing, in concert with his belief that you needed to focus on forward hip movement during the downswing, effectively lowered the SSA even farther down the spine, perhaps to the bottom of the rib cage. And that created a dramatic increase in lower back pressure, as you can see in the so-called "Reverse-C" finish that became common among those who copied Hogan's swing. (And rendered "keep your head still" totally useless.)
Which brings us to the modern day. With the vast amount of measuring equipment available to us, we've gone absolutely nuts trying to create the maximum amount of leverage we can... but that has created a new problem. If you're using your feet and lower body to create as much leverage as possible, you've moved the power source so far from the clubhead that it's almost impossible to control direction. That's a primary reason that you see so many new swing theories popping up. It's a search for control without losing any leverage.
The classic swing's pendulum motion made it much easier for the hands to control direction because the body, while it was moving, was relatively quiet. (Remember that the head naturally moves less during a classic swing.) But how do you increase control when the power creation system is moving the body so much more? You have two choices:
Compare this approach with players like Phil Mickelson, Bubba Watson or Jim Furyk, whose swings are more like Nelson and Snead. Look at Rocco Mediate on the Champions Tour, who used to have chronic back problems until he changed his swing. For Pete's sake, look at Stacy Lewis and Ken Duke -- both of whom have had scoliosis and yet play without chronic back problems! Those last three have swings that are more like what Ernest Jones would have taught but using a modern grip. (And again, I have to point out that modern graphite gives us the option to use shafts that are more flexible but don't have the inconsistency that plagued hickory. We have a lot more swing options these days.)
I guess my point here is that copying your favorite pro isn't necessarily the easiest way to become a better golfer. Many of the pros, in pursuit of some nebulous advantage over their opponents, are trying to combine swing elements that don't naturally work together. When they can make them work, it's a constant struggle -- both from a maintenance and a durability standpoint -- to keep them working. And for many players, it's becoming a question of whether these hybrid swings are going to shorten their careers.
As a weekend player, you may have to consider whether you want to swing like your favorite pro or whether you'd rather play golf for a long time. Because I'll tell you the truth -- there are simpler ways to play this game than watching the pros might lead you to believe.
Now it's time for me to make good on my promise... and making good on it means this is a fairly long post. I'm sorry, but there's no way around it.
You may remember the photo below, which was the first of three in that post. Classic swings and modern swings focus the grip pressure on different parts of the handle, and this photo shows that difference. As I said in that post, this difference has everything to do with the equipment -- the classic swing uses soft shafts, the modern swing uses stiff shafts. And the other photos showed how this simple change affects the hinging action of the wrists during the swing.
Now let's take a look at how these changes, both in equipment and therefore grip pressure, have caused the swing to evolve. You may need to refer back to the other post because I'm not going to repeat all of that information again. But it's not hard to follow along, because this is all very logical.
And if you pay attention, you'll understand why some of the "swing advice" you often hear doesn't help you at all.
All of these changes -- equipment, grip pressure, etc. -- have a number of effects on your swing, but one in particular is important to this conversation, and that's what I'll call your spherical spine axis. Yeah, I know that's a strange term to use, but I want you to imagine a ball joint similar to the ones you have in your shoulders. Those joints allow more than just a simple back-and-forth motion, or an up-and-down motion, or even the rotational twisting motion you use when you twist open a door knob. They allow you to move in all three of those axes. You might think of them as spherical joints.
When you swing your golf club, you get movement on a variety of axes as well. We talk about maintaining your spine tilt during your swing -- that's the angle at which you lean toward the ball. But you also have a sort of pivoting motion where your hips move back and forth along your target line; that's how you create your weight shift and allow your chest to "open" a bit at the top of your backswing and finish. And then there's the rotation of your shoulders as you create your coil. In an efficient swing, the pivot point of all three are very near each other, a point that is most easily understood as being somewhere along the length of your spine.
That point is what I'm calling your spherical spine axis, which I will abbreviate as SSA for the rest of this post. And that point has moved as the golf swing has evolved.
I want you to imagine a letter T. The crossbar of it reaches between your shoulders, and the downward bar runs down your spine. Can you imagine that?
In the classic swing, your SSA is located roughly where the two bars connect -- that is, right at the base of your neck. The swinging motion used with softer shafts doesn't create as much leverage because it's way too easy to overload soft shafts. By creating a high SSA, the amount of leverage is minimized. And that high SSA is in the natural location for the classic swinging motion.
How many of you have been told to "keep your head still"? That's more of a classic swing idea. Just think about it for a minute. With your SSA so close to your head, your head isn't going to move around very much in your swing. If it does, you're moving your upper body a lot... and that means you're moving your SSA around. In a well-made classic swing, your head stays relatively quiet during the swing.
Many of you are familiar with Ernest Jones. In fact, most modern instructors believe he teaches the classic swing and they base their criticism of classic technique on his teachings. But Jones doesn't teach classic swing for soft shafts. Rather, Ernest Jones tried to adapt the classic swing to stiff shafts. It never became popular because the SSA of a classic swing is too high to create the necessary leverage for a stiff shaft.
HOW CAN I BE SURE, you ask? It's simple logic if you know golf history. The R&A was the last of the governing bodies to make steel shafts legal for competition. As I said in the other post, that happened in late 1929. The Ernest Jones book Swing the Clubhead was published in 1937, over 8 years later! There is no logical reason for him to assume his readers were still using hickory shafts.
In addition, he says in the book that he teaches a pendulum swing, and it's a fact of basic physics that pendulums do NOT use leverage. This is why the classic swing never became the dominant way to swing steel-shafted clubs -- players couldn't get them to load with a pendulum swing, so they couldn't get the distance they wanted. That's not a problem since graphite shafts came along, but it was a very real problem until then.It took until the early 1940s for players to figure out how to load the stiffer shafts. Byron Nelson became the first to successfully do so when he realized he needed extra leg drive to create the necessary leverage. Sam Snead said the change from hickory to steel was the hardest thing the pros had to make. And each man approached the problem in his own way.
Nelson bent both knees toward the target to create load; he still wasn't particularly long but was unbelievably accurate. Snead bent the knees in opposite directions -- the infamous "Snead Squat" -- which created a greater loading on the club and gave him much more distance. And why did this work?
The increased knee action -- and this was primarily knee action, a slight downward flex with an upward push (ie, they straightened their lead knee at impact) created a bit more forward hip movement. The net effect of this action was to lower the SSA down the spine slightly. (The head moved a bit more as well. "Keep your head still" became less useful as a swing thought! At this point, teachers began to recommend a slight head movement away from the ball at impact.)
It wasn't a huge change, but it was enough to load the stiffer shafts of the time and create more distance. Even in the mid-1950s, the great player and teacher Tommy Armour recommended in his book How to Play Your Best Golf All the Time that weekend players should get softer shafts than they believed they needed. Softer shafts meant greater distance with less effort, so weekend players could focus more on making good swings than on generating distance.
I should point out that golfers using the "drop down" loading technique don't seem to have had the back problems we see nowadays. Just look at how long -- and how well -- players from that generation were able to play without debilitating back pain. Players like Tom Watson, Jack Nicklaus and Arnold Palmer -- each with his own very distinctive swing -- rarely if ever had to withdraw from tournaments because of recurring pain.
And then Hogan showed up, focusing on the concept we now call connection. And the practical result of keeping the upper arms so close to the player's side during the downswing, in concert with his belief that you needed to focus on forward hip movement during the downswing, effectively lowered the SSA even farther down the spine, perhaps to the bottom of the rib cage. And that created a dramatic increase in lower back pressure, as you can see in the so-called "Reverse-C" finish that became common among those who copied Hogan's swing. (And rendered "keep your head still" totally useless.)
Which brings us to the modern day. With the vast amount of measuring equipment available to us, we've gone absolutely nuts trying to create the maximum amount of leverage we can... but that has created a new problem. If you're using your feet and lower body to create as much leverage as possible, you've moved the power source so far from the clubhead that it's almost impossible to control direction. That's a primary reason that you see so many new swing theories popping up. It's a search for control without losing any leverage.
The classic swing's pendulum motion made it much easier for the hands to control direction because the body, while it was moving, was relatively quiet. (Remember that the head naturally moves less during a classic swing.) But how do you increase control when the power creation system is moving the body so much more? You have two choices:
- You can try to limit your lower body movement. Some players restrict their hip turn on the way back in hopes of increasing the leverage in the swing while also minimizing body movement in hopes of increasing accuracy. However, this puts a tremendous strain on your lower back. Hello, Jason Day and Michelle Wie! Does this sound familiar?
- You can try to increase your strength enough that you can create leverage with your trailing hand. This is an attempt to combine some of the classic swing hand techniques with the modern leverage techniques. The problem is that you end up working against yourself to a large degree. You're combining a classic control technique (high SSA) with a modern leverage creation technique (low SSA), and that creates a lot of conflicting stresses in your back. If everything goes perfectly, you can get good results... but it takes a ridiculous amount of practice and time in the weight room. And that extra practice creates wear and tear of its own.
Compare this approach with players like Phil Mickelson, Bubba Watson or Jim Furyk, whose swings are more like Nelson and Snead. Look at Rocco Mediate on the Champions Tour, who used to have chronic back problems until he changed his swing. For Pete's sake, look at Stacy Lewis and Ken Duke -- both of whom have had scoliosis and yet play without chronic back problems! Those last three have swings that are more like what Ernest Jones would have taught but using a modern grip. (And again, I have to point out that modern graphite gives us the option to use shafts that are more flexible but don't have the inconsistency that plagued hickory. We have a lot more swing options these days.)
I guess my point here is that copying your favorite pro isn't necessarily the easiest way to become a better golfer. Many of the pros, in pursuit of some nebulous advantage over their opponents, are trying to combine swing elements that don't naturally work together. When they can make them work, it's a constant struggle -- both from a maintenance and a durability standpoint -- to keep them working. And for many players, it's becoming a question of whether these hybrid swings are going to shorten their careers.
As a weekend player, you may have to consider whether you want to swing like your favorite pro or whether you'd rather play golf for a long time. Because I'll tell you the truth -- there are simpler ways to play this game than watching the pros might lead you to believe.
Sunday, September 25, 2016
Tim Weinhart on Practicing Your Wrist Hinge (Video)
Since I've been writing about the importance of using your hands more in your swing -- and since Bob Toski recommends practicing your hand action with shorter swings -- I'm posting this Golf Channel video from instructor Tim Weinhart showing one way you can practice wrist hinging with pitch shots.
His idea about practicing your pitching motion by using an underhand throwing motion is just one of many ways you can do it, although it's a very natural approach. It will also force you to slow down your change of direction because of the weight of the club. Even in a swing that develops a lot of speed, the change of direction is usually slower than you would expect.
However, I will point out something that few instructors will ever mention, even though many of them would recommend this drill wholeheartedly. Note that when Weinhart throws that golf ball with an underhand motion, he's holding the ball with the thumb, middle and index fingers of his trail hand. As I pointed out in yesterday's post, that's where you would put the grip pressure in a classic swing.
The best short game players have always based their short games on classic swing technique. Part of the reason modern pros have to practice so much is because they use two different swings in their game, whereas a classic player like Bobby Jones only had to practice a single swing technique for every shot he played. In his foreword to the book Bobby Jones on Golf, the famous golf writer Charles Price (who wrote for Golf World, Golf Magazine AND Golf Digest during his career) wrote:
Who knows? If you get good at it, the technique might even work its way into your full swing.
His idea about practicing your pitching motion by using an underhand throwing motion is just one of many ways you can do it, although it's a very natural approach. It will also force you to slow down your change of direction because of the weight of the club. Even in a swing that develops a lot of speed, the change of direction is usually slower than you would expect.
However, I will point out something that few instructors will ever mention, even though many of them would recommend this drill wholeheartedly. Note that when Weinhart throws that golf ball with an underhand motion, he's holding the ball with the thumb, middle and index fingers of his trail hand. As I pointed out in yesterday's post, that's where you would put the grip pressure in a classic swing.
The best short game players have always based their short games on classic swing technique. Part of the reason modern pros have to practice so much is because they use two different swings in their game, whereas a classic player like Bobby Jones only had to practice a single swing technique for every shot he played. In his foreword to the book Bobby Jones on Golf, the famous golf writer Charles Price (who wrote for Golf World, Golf Magazine AND Golf Digest during his career) wrote:
It would be the most natural assumption in the world to think that during those eight years Bobby Jones did little other than play golf. In reality, Jones played less formal golf during his championship years than virtually all of the players he beat, and he beat everybody in the world worth beating. Excepting the three seasons when he journeyed either to Scotland or England for Walker Cup matches and, while there, the British championships, he spent most of the tournament season playing inconsequential matches with his father and an assortment of cronies at East Lake, his home club in Atlanta, where his interests and activities ranged far beyond matters of golf. Often, he would go for months on end without so much as picking up a club. Instead, he studied mechanical engineering at Georgia Tech, got a degree in English literature at Harvard, dabbled in real estate, and then attended law school at Emory University. Midway through his second year, he took the state bar examinations, passed them, and so quit school to practice. As a result of these off-course activities, Jones averaged no more than three months a year playing in, and going to and from, tournaments and championships. (pp ix-x)That might be something you want to consider when practicing your short game using this underhanded throwing technique. Classic technique tends to require less practice to maintain it, so try using the classic method of gripping when you pitch and see if it helps improve your feel and consistency.
Who knows? If you get good at it, the technique might even work its way into your full swing.
Saturday, September 24, 2016
How You Squeeze the Club's Handle Matters
In yesterday's post I referred you to an article by Bob Toski on why it's easier to learn to play golf if you use your hands more. In my post I wrote the following:
And yes, there will be photos at the appropriate spots.
Since I mentioned that shaft flex is important to this discussion, here's a very brief history of shafts:
Alright, are you ready? Here's the first photo:
This is taken from a photo of Rory. The first thing you should notice is that a classic swing grip looks just the same as a modern swing grip. The change is a matter of which fingers are actually holding the club.
Let's start with the classic swing:

Since the classic swing actually grips the swing with the thumb and forefinger of the trail hand, the cocking (or hinging) of the club happens at that end of the grip. The club is actually held by the thumb and fingers of the trail hand AND the thumb and forefinger of the lead hand. Meanwhile, the last 3 fingers of the lead hand allow the butt end of the club to move slightly upward at the top of the backswing, then they apply a bit of light downward pressure to load the shaft during the downswing. This has two effects:
And because the club actually cocks (or hinges) at the "thumb end" of the trail hand, it feels as if the trail hand is actually controlling where the clubface is pointing at impact. In reality, both hands are controlling it but you feel the main pressure in your trail hand.
Now let's look at the modern swing:
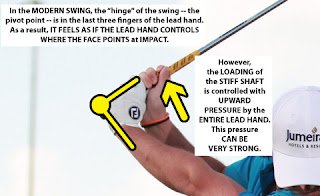
Whoa! Things changed up pretty quickly there! The hinge now moves all the way to the butt end of the club, while the trailing hand creates a lever fulcrum -- felt as a slight upward push -- as the club starts down. This is a power move designed to force that stiffer shaft to load. (In comparision, the soft shaft doesn't need us to make it load. Rather, we're trying to stop it from loading too much.) As a result of this, it feels as if the lead hand is controlling where the clubface points at impact -- although, again, both hands are doing it.
To get that fulcrum action during your downswing, you don't actually push up on the shaft. That upward motion is caused by the extra leg action. Your trail hand is just trying to hold its position relative to your lead hand, because otherwise the extra downforce could hurt your lead wrist badly. As a result, it feels as if you're pushing upward.
That's enough for today, I think. Take some time to digest this before we go any further. I think you'll find it helps clear up a lot of confusion about what you're trying to do when you swing.
And it's important to understand this post before you can understand what players like Jason Day and Rory McIlroy are doing... why it takes so much practice, so much time in the gym, and why it often makes their backs hurt. Again, we'll talk about that later.
Most teachers would say that Toski is teaching a classic swing and that the idea of "controlling the motion with the lead hand" is no longer correct. This shows a complete lack of understanding about the differences between a classic and a modern swing:If you understand what I was talking about, you'll be better able to decide if a golf tip you hear is something you can actually use. So today I'm going to explain in more detail what this means.
Why the difference? Because of the shaft flex. The classic swing uses a very soft shaft, so the trailing hand is the pivot hand; the trailing hand relaxes a bit at the top of the swing to control the flex. But the modern swing uses stiffer shafts, so the lead hand is the pivot hand; it keeps tension on the shaft so it will be forced to flex against the trailing hand.
- If you have a classic swing, it feels as if the TRAILING hand controls the swing, although both hands are working together.
- If you have a modern swing, it feels as if the LEAD hand controls the swing, although both hands are working together.
And yes, there will be photos at the appropriate spots.
Since I mentioned that shaft flex is important to this discussion, here's a very brief history of shafts:
- Although hickory (soft) shafts were the standard, club designers were looking for something better because hickory was inconsistent. They actually experimented with steel (stiff) shafts in the late 19th Century!
- It wasn't the shaft flex that made hickory shafts undesirable. Rather, it was the excess torque, the twisting motion of the clubhead during the swing (that is, the face would open and close, even if you kept your hands perfectly square). Soft modern graphite shafts don't have this problem, so a classic style of swing can work very well with modern equipment.
- Steel shafts didn't catch on everywhere until the R&A finally voted to allow steel shafts in competition in late 1929. So, for a while, both types of shaft were used in competition.
- It took players quite a while to figure out how to best use steel shafts because they were so stiff. Sam Snead said the switchover was the hardest thing the pros ever had to do.
- Byron Nelson is generally regarded as the one to discover that stiff shafts required more leg drive to properly load the shafts, around the mid-1930s. He used downward leg drive; it was Ben Hogan who popularized the forward leg drive often taught now.
Alright, are you ready? Here's the first photo:
This is taken from a photo of Rory. The first thing you should notice is that a classic swing grip looks just the same as a modern swing grip. The change is a matter of which fingers are actually holding the club.
- THE CLASSIC SWING uses SOFT SHAFTS and puts grip pressure in the thumb and index finger of the TRAIL HAND.
- THE MODERN SWING uses STIFF SHAFTS and puts grip pressure in the last 3 fingers of the LEAD HAND.
Let's start with the classic swing:
Since the classic swing actually grips the swing with the thumb and forefinger of the trail hand, the cocking (or hinging) of the club happens at that end of the grip. The club is actually held by the thumb and fingers of the trail hand AND the thumb and forefinger of the lead hand. Meanwhile, the last 3 fingers of the lead hand allow the butt end of the club to move slightly upward at the top of the backswing, then they apply a bit of light downward pressure to load the shaft during the downswing. This has two effects:
- It allows the player to prevent overflexing of the shaft, which makes consistent impact more difficult.
- It also increases the player's ability to "feel the clubhead" because the head movement is transmitted quite clearly down the softer shaft into the 3 relaxed lead hand fingers. I can verify this from my own practice.
And because the club actually cocks (or hinges) at the "thumb end" of the trail hand, it feels as if the trail hand is actually controlling where the clubface is pointing at impact. In reality, both hands are controlling it but you feel the main pressure in your trail hand.
Now let's look at the modern swing:
Whoa! Things changed up pretty quickly there! The hinge now moves all the way to the butt end of the club, while the trailing hand creates a lever fulcrum -- felt as a slight upward push -- as the club starts down. This is a power move designed to force that stiffer shaft to load. (In comparision, the soft shaft doesn't need us to make it load. Rather, we're trying to stop it from loading too much.) As a result of this, it feels as if the lead hand is controlling where the clubface points at impact -- although, again, both hands are doing it.
To get that fulcrum action during your downswing, you don't actually push up on the shaft. That upward motion is caused by the extra leg action. Your trail hand is just trying to hold its position relative to your lead hand, because otherwise the extra downforce could hurt your lead wrist badly. As a result, it feels as if you're pushing upward.
That's enough for today, I think. Take some time to digest this before we go any further. I think you'll find it helps clear up a lot of confusion about what you're trying to do when you swing.
And it's important to understand this post before you can understand what players like Jason Day and Rory McIlroy are doing... why it takes so much practice, so much time in the gym, and why it often makes their backs hurt. Again, we'll talk about that later.
Thursday, February 4, 2016
Ernie Els Attacks the Yips
It's been no secret that Ernie Els has been struggling with his putting, so much that he's been missing 18-inch putts. That's not good, especially if you're a pro.
The irony is that Ernie may have found a solution. At least, according to Golf Digest it seems he has.

Apparently Ernie has gone to a regular length putter -- no word on whether it's counterbalanced or not -- and he's putting crosshanded. (For you lefties out there, that's what righties call "left hand low.") According to the post, Ernie tried it last week at Qatar and didn't miss a putt inside 5 feet.
I should point out that Ernie has been putting crosshanded for a bit longer than that -- just look at the photo above. That's Ernie putting crosshanded at the Joberg Open in mid-January and, since he was missing those short putts the week before, I'm guessing Joberg is the 'official' start of the crosshand test.
I don't know why it took him so long to try it, but I hope it keeps working for him since the rest of his game is still so good. And I'm spending a post of my own on this because maybe it will help some of you who are struggling since the anchoring ban took effect.
And in case you couldn't tell, the photo came from the Getty Images site.
The irony is that Ernie may have found a solution. At least, according to Golf Digest it seems he has.
Apparently Ernie has gone to a regular length putter -- no word on whether it's counterbalanced or not -- and he's putting crosshanded. (For you lefties out there, that's what righties call "left hand low.") According to the post, Ernie tried it last week at Qatar and didn't miss a putt inside 5 feet.
I should point out that Ernie has been putting crosshanded for a bit longer than that -- just look at the photo above. That's Ernie putting crosshanded at the Joberg Open in mid-January and, since he was missing those short putts the week before, I'm guessing Joberg is the 'official' start of the crosshand test.
I don't know why it took him so long to try it, but I hope it keeps working for him since the rest of his game is still so good. And I'm spending a post of my own on this because maybe it will help some of you who are struggling since the anchoring ban took effect.
And in case you couldn't tell, the photo came from the Getty Images site.
Sunday, January 17, 2016
Chris O'Connell's Three Swing Fundamentals
Chris O'Connell's students include Matt Kuchar and Scott Piercy, and he was GC's Golf Channel Academy Coach of the Week this past week. Here's a quick video he did with three basics he feels all golfers should know. (Hey, he said beginning golfers but fundamentals are the same at every level!)
Three very simple basics:
Keep it simple, folks. Always check your basics first when something goes wrong in your swing, and you'll find it's easier to keep your swing working correctly.
Three very simple basics:
- Grip the club primarily in your fingers, not your palms. Some instructors differ on exactly what this means. Some swing methods put the club more in the palms, like the Natural Golf method (the one based on Moe Norman's swing). Some want the club cradled diagonally across the palm and fingers (the butt end is more under the heel pad), which is more Hoganesque. O'Connell puts it mostly in the fingers; there's a very clear view at the :18 second mark.
- Your swing plane shouldn't be too upright or too flat. Note that he doesn't give you a specific angle that it should be, although I'm sure he has a specific plane he looks for in his pupils. (He teaches the Plane Truth method a la Jim Hardy.) But the fundamental is to avoid extremes. His 'ferris wheel / merry-go-round' image is pretty cool.
- Finish with your weight on your lead foot. Again, note that he doesn't give any particulars about how to move your lower body here. He just wants you to make a forward weight shift -- that is, move from your trailing foot to your lead foot during your downswing -- so you don't fall backward when you swing. You make better contact with the ball this way.
Keep it simple, folks. Always check your basics first when something goes wrong in your swing, and you'll find it's easier to keep your swing working correctly.
Sunday, December 20, 2015
Byron Nelson Talks About the Grip
Since it seems that I'm reviewing basics this week, I thought I'd post this old video of Byron Nelson talking about how to create a grip that helps you square the clubface. It has bits and pieces from several clips Lord Byron had done before, so it's a great look at how his grip evolved.
Watch the video, then I'll focus on a few things that will help you create your own grip -- even if you don't do it exactly like Nelson.
First, I've taken a still from the video and added a white line to emphasize something you should know, no matter whose grip advice you take. Take a look:
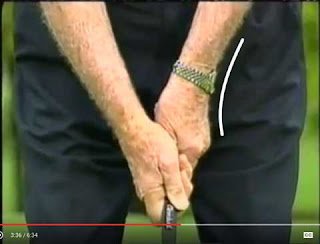
Do you see that white curve I added near his lead hand? He has the club handle leaning very slightly forward but there's still a pronounced curve from his forearm to his wrist. Some teachers do this, some don't. Whether a teacher does this or not affects all the other advice he or she gives you, so make sure you know whether they 'curve' their lead wrist like this or not. It's super important to know that if you want to get the results that teacher wants you to get.
In this case, even though Nelson says that the back of his lead hand is pointing at his target, the same way the palm of his trail hand is, it doesn't look that way when you see this picture. You need to understand that when the back of your lead hand is 'square' to the target, it may actually look as if your hand is at a slight angle. That's because most of us, when we stand with our hands at our side, actually turn our hands inward at a slight angle. Stand in front of a mirror and take a good look; you probably do it too.
That means that 'square to the target' means that your lead hand is at the same angle as it is when your hands hang at your side. Again, that's super important to know that in order to get the results you expect.
Finally, please note that Lord Byron says that the lead hand guides the club and the trailing hand provides both power and feel. He also says that your trailing hand shouldn't swing past the lead hand -- or, if you prefer, the trail hand shouldn't swing FASTER than the lead hand -- or you'll end up mis-hitting the ball. You are using both hands together, and that's why teachers emphasize relaxed forearms and wrists. If they are relaxed, they will travel at about the same speed and you're unlikely to flip your hands at impact.
I hope you find the video helpful, and also that the tips in this post help you get better results from whatever grip your teacher is teaching to you.
Watch the video, then I'll focus on a few things that will help you create your own grip -- even if you don't do it exactly like Nelson.
First, I've taken a still from the video and added a white line to emphasize something you should know, no matter whose grip advice you take. Take a look:
Do you see that white curve I added near his lead hand? He has the club handle leaning very slightly forward but there's still a pronounced curve from his forearm to his wrist. Some teachers do this, some don't. Whether a teacher does this or not affects all the other advice he or she gives you, so make sure you know whether they 'curve' their lead wrist like this or not. It's super important to know that if you want to get the results that teacher wants you to get.
In this case, even though Nelson says that the back of his lead hand is pointing at his target, the same way the palm of his trail hand is, it doesn't look that way when you see this picture. You need to understand that when the back of your lead hand is 'square' to the target, it may actually look as if your hand is at a slight angle. That's because most of us, when we stand with our hands at our side, actually turn our hands inward at a slight angle. Stand in front of a mirror and take a good look; you probably do it too.
That means that 'square to the target' means that your lead hand is at the same angle as it is when your hands hang at your side. Again, that's super important to know that in order to get the results you expect.
Finally, please note that Lord Byron says that the lead hand guides the club and the trailing hand provides both power and feel. He also says that your trailing hand shouldn't swing past the lead hand -- or, if you prefer, the trail hand shouldn't swing FASTER than the lead hand -- or you'll end up mis-hitting the ball. You are using both hands together, and that's why teachers emphasize relaxed forearms and wrists. If they are relaxed, they will travel at about the same speed and you're unlikely to flip your hands at impact.
I hope you find the video helpful, and also that the tips in this post help you get better results from whatever grip your teacher is teaching to you.
Friday, November 13, 2015
Don't Over-Squeeze the Toothpaste!
This is a super-simple tip from GC's Lead Coach of the Week, Kenny Nairn. Here's how to use a tube of toothpaste to learn proper grip pressure!
Just take the top off the tube and grip it tight enough to get the toothpaste just barely squeezing out of the tube, then duplicate that pressure when you swing your driver. How simple is that?
Just take the top off the tube and grip it tight enough to get the toothpaste just barely squeezing out of the tube, then duplicate that pressure when you swing your driver. How simple is that?
Thursday, July 30, 2015
3 Swing Images from Sam Snead
This is one of those Martin's Bookshelf bits from School of Golf. You can never go wrong copying Sam Snead; the greatest players in the game have said that just watching Slammin' Sam was enough to help their game.
This video includes 3 images from Sam's instructional book Sam Snead Teaches You His Simple "KEY" Approach to Golf.
These images are:
This video includes 3 images from Sam's instructional book Sam Snead Teaches You His Simple "KEY" Approach to Golf.
These images are:
- Put your hands in a holster at setup
- Lay the club on a bookshelf for a moment at the top of your backswing
- Throw an apple off the shaft at impact
- The holster image is another way of teaching you not to rotate your forearms during your takeaway. If you use this image, the necessary rotation will happen at your lead shoulder and be controlled by the bending of your trailing elbow. You'll be in better position at the top, which means you'll return the club to the ball more consistently.
- Although Martin is demonstrating the move down with a forward hip shift, Sam actually started down with a squat -- that is, the knees flexed so that they actually separated a little (the trailing knee actually moves slightly AWAY from the target and the lead knee moves slightly TOWARD the target). This wasn't a huge squat -- it's actually very slight -- and he did shift his weight to his lead foot as he swung, but initially your body moves DOWN before moving toward the target. This is what used to be called the "modern" swing as opposed to the Hogan swing. You'll find it easier to use this image if you know that.
- Finally, this is yet another way to practice carrying your wrist cock later into the downswing. If you get good at this drill, you should pick up some noticeable distance.
Tuesday, May 19, 2015
David Leadbetter's "A" Swing
No doubt you've been hearing about David Leadbetter's new book The A Swing, which he says is a simplified swing method that doesn't need as much practice. I've just received a pre-release copy of the book that I'm reading now and I plan to talk more about it after I've finished it.
In the meantime Golf Digest has put up an introductory article about the swing, complete with several short videos to help you understand what all the fuss is about. Here's the "most introductory" of those videos:
There are a number of small changes that the A Swing makes to your setup and motion. Primarily it's an attempt to simplify the backswing and get the club into "the slot" more easily in the downswing. Leadbetter says he's been using a number of these ideas in one form or another over the last few years with various players of different skill levels, and that he has written the book in hopes that it will shake up the teaching industry and simplify teaching.
The book begins with an intro by Michelle Wie and the first chapter -- which is what I'm currently reading -- is a biomechanical analysis by expert J.J. Rivet. And Leadbetter says that the swing can be maintained using a 7-minute practice routine performed several times a week. (That's near the end of the book, of course.) As I said, I'll be talking more about this after I finish the book.
In the meantime you might want to take a look at the "A Swing Starter Kit" article at golfdigest.com and get familiar with the basics of it. I don't know if the book will actually stimulate any change in teaching methods, but my initial impression is that there are some useful ideas there.
In the meantime Golf Digest has put up an introductory article about the swing, complete with several short videos to help you understand what all the fuss is about. Here's the "most introductory" of those videos:
There are a number of small changes that the A Swing makes to your setup and motion. Primarily it's an attempt to simplify the backswing and get the club into "the slot" more easily in the downswing. Leadbetter says he's been using a number of these ideas in one form or another over the last few years with various players of different skill levels, and that he has written the book in hopes that it will shake up the teaching industry and simplify teaching.
The book begins with an intro by Michelle Wie and the first chapter -- which is what I'm currently reading -- is a biomechanical analysis by expert J.J. Rivet. And Leadbetter says that the swing can be maintained using a 7-minute practice routine performed several times a week. (That's near the end of the book, of course.) As I said, I'll be talking more about this after I finish the book.
In the meantime you might want to take a look at the "A Swing Starter Kit" article at golfdigest.com and get familiar with the basics of it. I don't know if the book will actually stimulate any change in teaching methods, but my initial impression is that there are some useful ideas there.
Saturday, February 21, 2015
Shaping Shots with Grip Tension and Swing Speed
This is a clip from Martin Hall's 2014 year-end show for School of Golf. (You can tell because if you look closely at the big TV screen in the background, you can see the logo for the year-end "Martini Awards" he gave out.) It focuses on a tip from Johnny Miller on how to create different shot shapes WITHOUT changing your stance or swing plane.
Since some of us have trouble figuring out how to get a draw or fade when we need it, this is yet one more method that may work for you when other methods have not.
Again, bear in mind that you don't have to change your stance or swing plane to use this method. That means you don't have to open or close your stance, you don't have to strengthen or weaken your grip, and you don't have to create an in-to-out or out-to-in swing plane.
You always set up for a straight shot; you just aim to one side of the fairway or the other, depending on what shot shape you want to create. For example, righties would aim to hit a straight shot into the right side of the fairway to create a draw (the shot will curve back to the left, toward the center of the fairway) while lefties would aim to hit a straight shot to the left side of the fairway to get a draw.
Once you get set up, you make two changes:
By relaxing your grip and feeling like your downswing is slower than your backswing, you create a "flippy" motion that will help the club head pass your hands as you hit the ball. That will make the face close and give you a draw.
But by tightening your grip and feeling like your downswing is faster than your backswing, you create a "dragging" motion that keeps the club head from passing your hands. That makes you leave the face open and therefore hit a fade.
It's certainly not the only way to get these shot shapes, and it may not work for some of you because there's definitely some timing involved. But it has the advantage of being simple to try, plus it doesn't require any tricky address changes. If you have trouble creating shot shapes when you need them, a little time practicing this on the range may be just the ticket for shaving a few strokes off your score.
Since some of us have trouble figuring out how to get a draw or fade when we need it, this is yet one more method that may work for you when other methods have not.
Again, bear in mind that you don't have to change your stance or swing plane to use this method. That means you don't have to open or close your stance, you don't have to strengthen or weaken your grip, and you don't have to create an in-to-out or out-to-in swing plane.
You always set up for a straight shot; you just aim to one side of the fairway or the other, depending on what shot shape you want to create. For example, righties would aim to hit a straight shot into the right side of the fairway to create a draw (the shot will curve back to the left, toward the center of the fairway) while lefties would aim to hit a straight shot to the left side of the fairway to get a draw.
Once you get set up, you make two changes:
- For a DRAW, you want to RELAX your grip and make your downswing SLOWER than your backswing.
- For a FADE, you want to TIGHTEN your grip and make your downswing FASTER than your backswing.
By relaxing your grip and feeling like your downswing is slower than your backswing, you create a "flippy" motion that will help the club head pass your hands as you hit the ball. That will make the face close and give you a draw.
But by tightening your grip and feeling like your downswing is faster than your backswing, you create a "dragging" motion that keeps the club head from passing your hands. That makes you leave the face open and therefore hit a fade.
It's certainly not the only way to get these shot shapes, and it may not work for some of you because there's definitely some timing involved. But it has the advantage of being simple to try, plus it doesn't require any tricky address changes. If you have trouble creating shot shapes when you need them, a little time practicing this on the range may be just the ticket for shaving a few strokes off your score.
Wednesday, December 31, 2014
The Final Driving Tip of 2014
Yes, it's only appropriate that we end 2014 with a driving tip. This golf.com article says it will give you 10 more yards with your driver -- indeed, that it will make you longer with every club in the bag.
I found this fascinating because it's a tip that goes against the advice you hear from most teachers... but it's actually a fundamental of the classic swing from a century ago!
As you can see from the article's photo, you're trying to get the club shaft parallel to the ground at waist high rather than taking the club back so sharply inside. I routinely recommend this move -- you can check out my now notorious article on how to make a relaxed one-piece takeaway if you need proof -- but what stands out in this article is how Brad Brewer recommends you do it. He says:
However, the great Harry Vardon -- you know, the guy they named the Vardon grip after! -- recommended exactly the same thing in his 1905 book The Complete Golfer. He specifically said that the grip should be concentrated in the forefinger and thumb of each hand to improve release. There are a variety of reasons why this makes sense, but let me suggest just one...
When you want to use a flyswatter or a tack hammer -- tools which require a lot of relaxed wrist action -- don't you grip them primarily with your thumb and forefinger?
While Brewer is merely suggesting this as a drill -- and he does point out that it will feel odd at first, so don't be surprised -- you might want to consider trying it on the course once you get used to it on the range. You might be surprised at how freely your wrists move when you focus your grip in those fingers.
And with that tip, we bid farewell to 2014. Remember not to drink and drive tonight... especially if you tend to hit wild slices or duckhooks. ;-)
I found this fascinating because it's a tip that goes against the advice you hear from most teachers... but it's actually a fundamental of the classic swing from a century ago!
As you can see from the article's photo, you're trying to get the club shaft parallel to the ground at waist high rather than taking the club back so sharply inside. I routinely recommend this move -- you can check out my now notorious article on how to make a relaxed one-piece takeaway if you need proof -- but what stands out in this article is how Brad Brewer recommends you do it. He says:
Take your normal grip with your driver and then let go with the last three fingers on each hand, leaving only your thumbs and index fingers on the handle.Yes, he's suggesting that you do his drill while holding the club with the thumb and forefinger of each hand. Ever since Hogan became the yardstick for golf teachers, this has been a no-no! Such a grip supposedly tightens the wrist and limits the free cocking and uncocking of the wrists.
However, the great Harry Vardon -- you know, the guy they named the Vardon grip after! -- recommended exactly the same thing in his 1905 book The Complete Golfer. He specifically said that the grip should be concentrated in the forefinger and thumb of each hand to improve release. There are a variety of reasons why this makes sense, but let me suggest just one...
When you want to use a flyswatter or a tack hammer -- tools which require a lot of relaxed wrist action -- don't you grip them primarily with your thumb and forefinger?
While Brewer is merely suggesting this as a drill -- and he does point out that it will feel odd at first, so don't be surprised -- you might want to consider trying it on the course once you get used to it on the range. You might be surprised at how freely your wrists move when you focus your grip in those fingers.
And with that tip, we bid farewell to 2014. Remember not to drink and drive tonight... especially if you tend to hit wild slices or duckhooks. ;-)
Subscribe to:
Posts (Atom)